Wednesday, April 30, 2014

My first baking experience and Eggless vanilla sponge cake

Before I start,

If you are a Pro in baking -->>Sit back ,Relax and laugh for sometime !!
If you are budding baker  -->> Hey girl !! You will thank me for sure !!Keep reading!!

This time I am sharing my first baking experience something different other than craft project or you even call this as "DIY cake"!!. I am not a great cook but I like trying new things just as I do in crafts.We celebrated our 1st Anniversary 2 weeks before ,I tried this cake to enjoy the occasion sweetly. I was searching around the internet for a egg less cake as we are practicing "egg less home ":P and also I don't know to handle it properly :P.I ended up with the recipe from spiceupthecurry.com .I took the list of ingredients and went to walmart.

I don't even know that sweeten condensed milk(Main ingredient for eggless) will be in the baking aisle and I was searching for it in the milk section for long time by poking my face inside each freezer :P (See how innocent I am :)).And the other fun part is that I thought it will be in a "tetra pak" but no!!It comes in small tin :) just in case you are thinking like me !!

As this is my first time I don't want to try everything from the scratch so I got "Duncan Hines" Whipped vanilla cream and "Betty crocker" cake icing.(As always there was lot of frosting and icing to select from I just got this saying "Girl!!This is your first try.Just go on!!")

There was too many to select from ,I actually can't understand the difference between the things like "Whipped frosting vanilla cream " ,"Whipped vanilla cream " and "Homestyle creamy".If anybody reading this knows the answer kindly share it in the comments below so that it will be helpful for somebody who is like me :)

Next important thing is can opener!!Out of all ingredients!!Include this also in your shopping list if you don't have one.I have one but I don't know where I kept it and I want to make the cake ready by the time he comes from the office.Oh my god !!I was using all my energy to open it with scissors ,knife and back of the knife holder.I was literally making a noise as if some one was trying to break something to enter into the house :P(I think even they make it without the noise:P).Atlast ,I could able to make a small hole. So ,keep this in the mind !!Opening a tin can without a can opener is not a easy job !!Be prepared !!

All website gives you recipes but not things like this !!ISo, I thought I could share my experience so that  someone who is just starting to learn like me will have a smooth cake baking experience.

Here is the link to the recipe : http://www.spiceupthecurry.com/eggless-vanilla-cake-recipe/

Things you may wish to know ,what happened after baking :

It was mentioned that it yields one 9 inch cake .But no problem if you try this in 8 inch round pan too.Because I feared the cake will overflow if it is a smaller pan:P(Again, I have no shame in telling you all this :)) These points may sound silly to you but I am sure it will help somebody like who never know anything about baking just like me :).

1)8 inch round pan was perfect.

2)Me and my cousin were discussing that eggless cake will not be as sponge as cake that has egg .But It was as sponge as cake that has egg.

3)The whipped vanilla cream and icing that I used tasted good and sweet !!
4) I used butter knife to apply frosting in case you wonder if you want to buy a separate thing to apply frosting.
5)It gives 10 pieces per cake. So, If you are only two in home like us.Then this is perfectly the recipe for you.

We are enjoying the cake happily !!

This is a little background decoration I made it for $2 with 2 packs of dollar store plates.


If you have any doubts or clarification just like me !!!!Feel free to comment below or write to vikalpah@gmail.com .I will be happy to share my experience and will try my best to clear the doubts you have from my experience.

Hope you had a nice time knowing a few innocent me in baking!!!

Friday, April 25, 2014

DIY Felt Pouches

Finally Mr.Sun has come out and its time for our sunglasses!!Not at all sun glasses comes with a protective cover/box to keep it safe.When you just throw it inside your hand bag along with other stuffs ,it just tangles with your ear phones and other stuffs in your bag and also make some scratches.So here is a easy way to make a colourful protective pouch for your sunglasses.Let's see how to make it.


Materials Required :
One felt fabric sheet of your favorite colour choice(9" x 12")
Button
Needle
Embroidery thread
Fabric scissors

Step 1: Cut the fabric pieces.Place your sun glasses and leave half inch allowance on all sides and cut a piece.With that piece as a pattern cut another piece leaving 1.5" inch extra lengthwise on one side for the closing flap.
Measurement I used :
Flap piece(Red) : 4" width & 8.5" Length
Front Piece(Beige) : 4" width & 7"Length
Both can be of same colour of different colours.It is totally optional.


Step 2: We are going to use blanket stitch to close the three sides to make it as pouch.Thread the needle .I used double yarn and doubled it again and secured a knot at the end.Start from the right top.Take your needle and start from the inside of the Front piece to the outside.

Step 3: Now,Insert the needle from outside of the flap piece(Back) to the outside of the front piece(Front) at the same place forming a loop.Insert the needle into the loop and pull lightly to form the first stitch.


Step 4: Leaving a small gap, insert the needle from outside of the flap piece(Back) to outside of the front piece(Front) forming a loop and insert the needle into the loop and pull lightly to complete the stitch.Repeat the stitch in regular intervals to complete all the three side.


Look of the stitches from various angles


Finished Final look after completing the stitches on all the three sides


 Step 5: Sew a button at the center with a normal stitch and to make a button hole ,fold the flap into half and make a slit with scissors.Be careful not to make a bigger slit.The slit should be slightly big enough for the button to go through it. Shape the edges of the flap if you wish. Tada!!!!Now the pouch is done!!! I am ready to rock the spring & summer with my felt pouches.Are you ready?
Stitched button

Button hole Slit


You can add some embellishments to decorate it.I used hot glue gun and some geometric shapes of felt pieces along with tiny mirrors to add the embellishments.You can get creative with the choice of colour and patterns you use.You can also use printed felt /leather/vinyl to do this.


You can add some beads or pearls after each stitch to make it more decorative.

Printed felt with beads

Vinyl pouch with beads


When you first start learning to do this stitch make large stitches and practice.Once you get hold of the stitch ,do smaller stitches.I recommend small stitches for this pouch because the temple tips(Oh yes!!Google said me so!!:P,it means edges of the two holding bar that holds the specs.I got you!!Now you are asking to yourself what you would say that ?? :P )  of the sunglasses will poke out through the hole, if you make it large.

This was my first trial :)


You can also do variations in patterns to make a small pouch as shown below.Mother's day is coming soon and this will be a perfect gift :)


Hope you enjoyed this weekend's colourful DIY to enjoy your spring and summer.If you are making this what colour will you make ??Feel free to share you comments below or write to vikalpah@gmail.com.


Have fun crafting !!!


Wednesday, April 23, 2014

Some Makeovers & Good Finds

Anything that is plain,blank will catch my eye with urge to make it look new & colourful .I always wish things around me to be colourful and definitely not in plain,black & white or blank.I got few teak wood bowls in flea market for a very good deal.I just did not have any idea for what I am going to use it for but I was sure I will definitely find a purpose for it.I thought a little makeover will make it look more beautiful and I can use it for storing my accessories.

First I tried painting it with normal acrylic paint.I was not satisfied with the result as it was very light and it did not stick nicely.Next I decided to tried it with Martha Stewart Multi surface paint,Yes!!! It did the job really nicely.I used the satin green and violet along with metallic gold paint.


Cover the top and bottom with masking tape and draw the designs roughly with white crayons (optional).What next ??? Of course !!Painting.Choose your favourite colours and designs ,apply two to three coats and seal it with a acrylic sealer.Voila!!!You now have a new bowls with super cool designs !!Isn;t it colourful ??

Lately, I'm so obsessed with the gold paint and so with sharpie metallic markers.I used these markers and gave a little makeover to my hard disk , Book holder and a small pouch.Here are the before and after.
Used a quote from Google Images as an inspiration to do this

Tutorial for this is coming soon.

Isn't crazy ?? Used sharpie gold marker to draw this paisley.

Tip : To remove Sharpie marker from any of these or some scribbling by a little kid ,use rubbing alcohol to remove it.

What things that you will do a makeover at your home?Feel free to share your comments below or write to vikalpah@gmail.com.I will be happy to hear from you.


Some Good finds ...
do Terra Essential oils :
As I am going to my home country next month, I was searching around the internet to find some good and useful stuffs to get for my parents and grandparents.I have never used essential oils but have heard about it in many videos I see.So, I thought first I should give a try before I get it for my grandparents. I ordered Introductory kit in amazon a month ago to give it a try.
Peppermint oil :
My husband  usually has tablets when he gets headache , I totally want him to avoid using it.So, last time when he had headache, he used peppermint oil and it really worked !!! Even I tried it once when I got and really worked for me too.
Lavender oil :
When I was working on sewing project yesterday,I cut my hand with scissors and I suddenly remembered about do Terra. Now, Its time to test the lavender oil . I left a drop of it in my hand and used tissue paper above it to stop the blood.It was so soothing that I dint even have the feeling that I had a cut.So ,Lavender also works!!
Lemon oil :
Still did not find any great use for it.But I tried it using two drops in my water bottle as mentioned but I did not like the taste .I felt the lemon juice would taste great compared to using lemon oil in the water.I am sorry Mr.Lemon :( .Soon, will find a good use for you too !.

This image is taken from the web.


Next comes...
Sugru :
Have you ever heard about Sugru ??It is a self setting rubber for fixing and improving stuffs at your home.I don't know why I liked it a lot before even trying it, I ordered 2 packs instead of one :P by mistake. I think may be because it looks like polymer clay :) . Now I got another new item to get crafty with :) .I used sugru yesterday to cover the ends of iPad charger to prevent it from breaking .From now I don't have to worry about carefully pulling them in and out while putting it to charge and unplugging.
To know more about Sugru and crafty ways of using it , click here.


This image is taken from the web.
                                         
Note :This is not a sponsored post by Sugru or doTerra.They are no way related to this post. These products are purchased by me and  these are my personal opinions about the products.

Tuesday, April 22, 2014

Happy Earth Day !!!

As today is Earth day ,lets celebrate by making some recycle or upcycle crafts.I am listing the links to various recycle or upcycle crafts I have done so far.


1) Crafts from Cereal box
2) Eyeglass case makeover
3) Pen holder using magazine papers
4) Milk jug crafts
5) Containers Makeover
6) Glass etching
7) Flower vase from a juice bottle.

What are you waiting for ??I am sure you will have supplies to make any one of these projects lying around your home.Grab them and start crafting to celebrate the day.

Have fun Crafting!!

If you have any clarifications,feel free to leave your comments below or write to vikalpah@gmail.com.

Friday, April 18, 2014

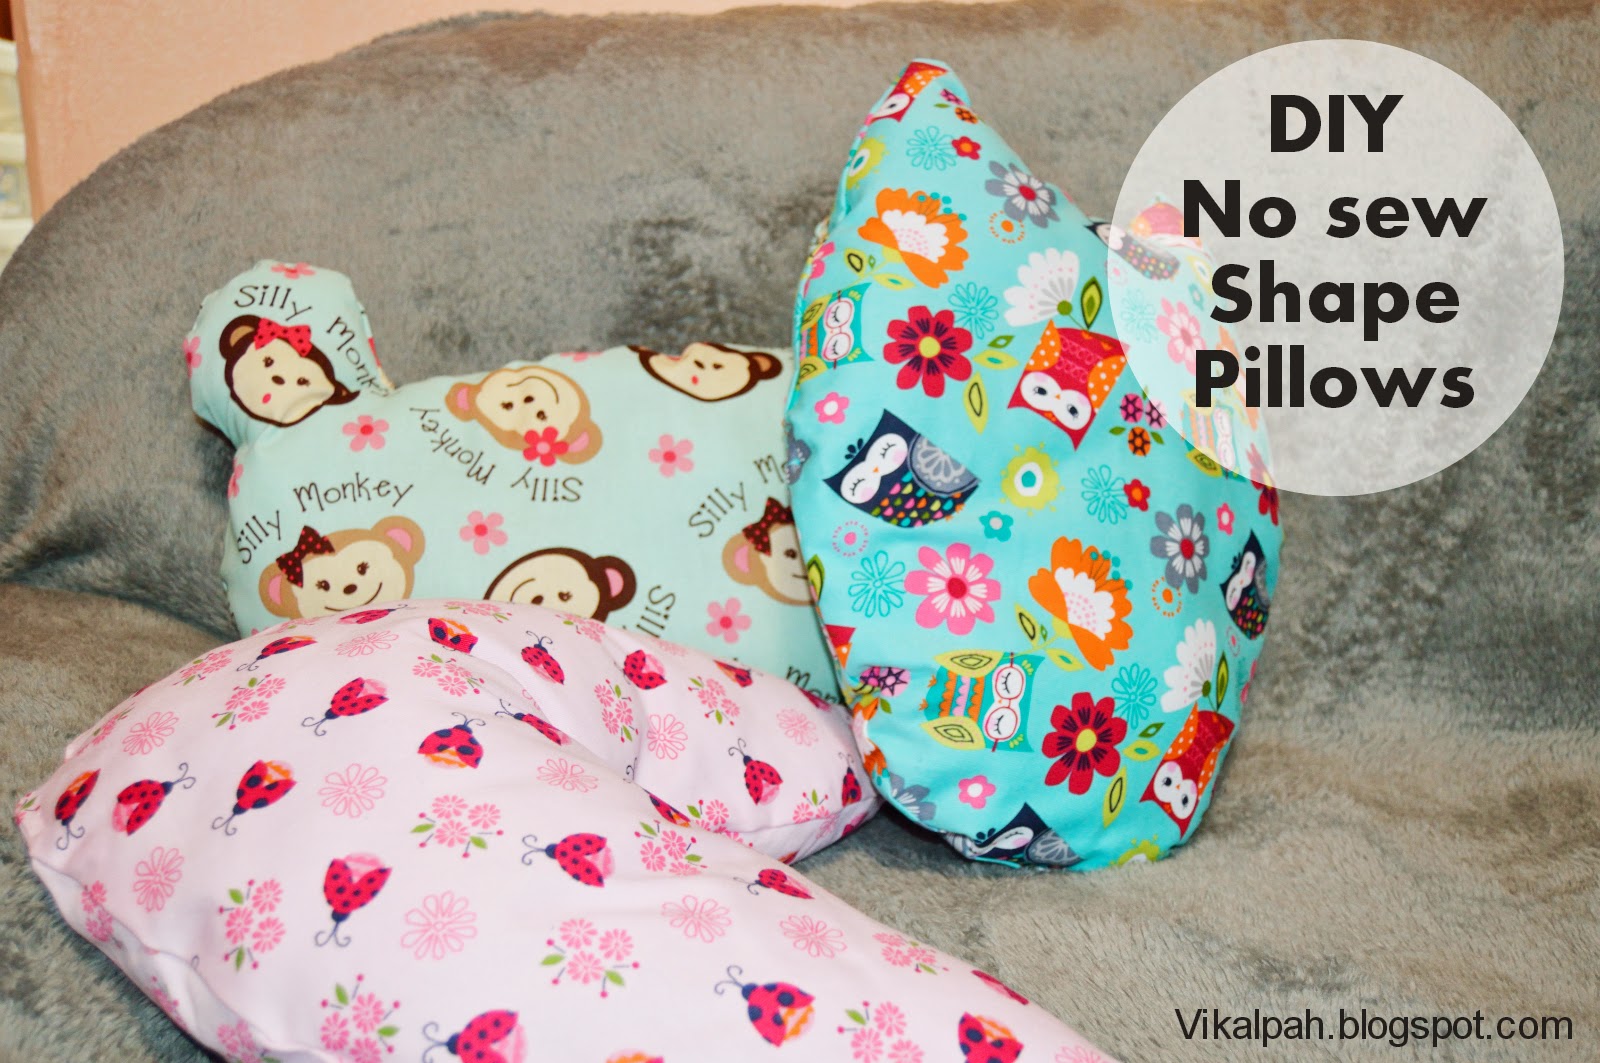
DIY No Sew Shape Pillows

I am going to my home country for vacation and I was thinking what handmade to make and take for my young cousins and aunt's sons.I thought they will love some colorful fun shaped pillows.As I have no sewing machine ,I made these pillows with fabric glue.Made a sample pillow to test the strength of the glue and yes!It works!!.Just a few simple steps to make a colourful huggable pillow for your kids.Lets see how to make it.
Materials required :
1/2 yard of solid cotton fabric
Poly-fill for stuffing
Fabric glue(I used Aleene's OK to wash it)
Fabric scissors.
Tailor's chalk/marker.
Iron

Step 1: Iron your fabric and fold it in such a way you have two layers of fabric and right sides facing each other.
Step 2: Draw your pattern on to pattern paper/newspaper and cut it.(I just did it free hand.)Trace the pattern on to the wrong side of the fabric .Leave 1/2 to 1 inch seam allowance ,if you have not cut the pattern with seam allowance.


Step 3:Cut the fabric pieces and apply the glue all over the edge of the pattern leaving a gap such that your one hand can go through for filling the stuffing. (This should be done by keeping both the pieces right sides facing each other.


Step 4: Allow the glue to dry for 24 hours (Refer the instructions on the glue bottle) and turn the pieces inside out using that gap.If you feel you did not get a crisp edges ,turn it to the wrong side again and make small slits in the seam allowance (As shown) all over and reverse it.Be patient and careful while doing this because if you make a large slit it will spoil the pillow.

Step 5: Fill it with the stuffing and close the gap with the glue .To keep it closed , use binder clip or cloth pin after applying glue.Leave it ,for 24 hours to dry . Tada!!your shape pillow is now ready!!


I took the shapes from the fabric prints I used for the pillows.Like lady bug body shape ,owl outline and the silly monkey face.


I also made some car pillows for my aunt's son in the same procedure above and one car pillow with a little additional steps. My aunt has got a new car so I thought it would be fun to make a pillow in the same color and shape of the new car to present it to my aunt's 4 year old son.Can't wait to see his reaction for this pillows :):)
I used Heat and bond interfacing and solid white cotton fabric to add white windows and wheels.I used black fabric markers to add details.


Some work in progress pictures of the blue car pillow.
Trace your windows & wheels on to the white solid cotton fabric.Don't forget to trace one set of windows by flipping the pattern.

Iron the Heat and bond to the wrong side with the plain white side up(Refer the instruction on the pack).

Cut the windows ,peel the backing and Iron to the pillow.

Use the fabric marker and add the details !!

You can also use white fabric paint to add windows, if you don't want to use heat and bond sheets.


If you want to sew these pillows replace the glue with stitches and to do the final step ,sew the gap with a row of stitches or hand sew.

If you make a pillow,what shape will you make ? Feel free to share your comments below or write to vikalpah@gmail.com for any clarifications.

Have fun Crafting !!

Note : I have linked the materials I used and some sewing terminologies if you are new to sewing,for your convenience .I got all the materials at Jo-Ann so I have linked to their website.This post is not sponsored by Jo-Ann :)