Are you going to try your first laser-cut puzzle using XTool M1 Ultra ? You have come to the right place. Here I am going to share with you two puzzles I made for my 8-year-old son, who is a cricket fan, and my one-year-old, who is ready to explore puzzles. Here, I am sharing the step-by-step procedure I followed to create the puzzles.
Paint palette color puzzle
Materials Used :
Basswood plank used for top layer
Basswood plank used for base layer
Acrylic paints
Paint brush
Wood glue or super glue
Wood knob (I used the Mushroom decor pieces from Dollar tree which served as a perfect knobs for the puzzle piece)
Step 1: Download a free paint palette clip art or any image in the shape you desire onto the XCS software. Use the trace or offset feature to get the outline of the paint palette. Then, use the shape tool to draw the circles and the text tool to write the names of the colors. When you click the arc to the right of the text tool, you can easily curve the text to match the arc of the circle.
Step 2: Copy and paste the outline and the circles onto another canvas (This is going to be your base layer). Choose the settings for the base layer. Click on the layers icon(last on the bottom left) - select the outline vector and click cut. Select the circles and select the score. I selected scoring because it helps in coloring the circles.
Then, for the top layer, select the outline design and circles, and select cut. Then, for the texts, select engrave.
I designed this color puzzle inspired by the Montessori Color box 2, so I have included primary colors - red, blue, yellow, secondary colors - green, purple, orange and brown, pink, gray, black and white. In total, it includes 11 colors.
Step 3: Once the layers are cut, start painting the base layer circles and the circle wood pieces cut from the top layer in respective colors using acrylic paint. It may require two to three coats of paint, depending on the brand of acrylic paint.
Step 4:Once the paint is dry, glue the knob for the circle pieces using wood glue. Then glue the top layer and base layer together using glue. The puzzle is now ready.
Note: I have used two different glues to try out which one has a strong hold. These two glues have different purposes. The wood glue takes a long time to dry, whereas the super glue is quick and has a strong hold.
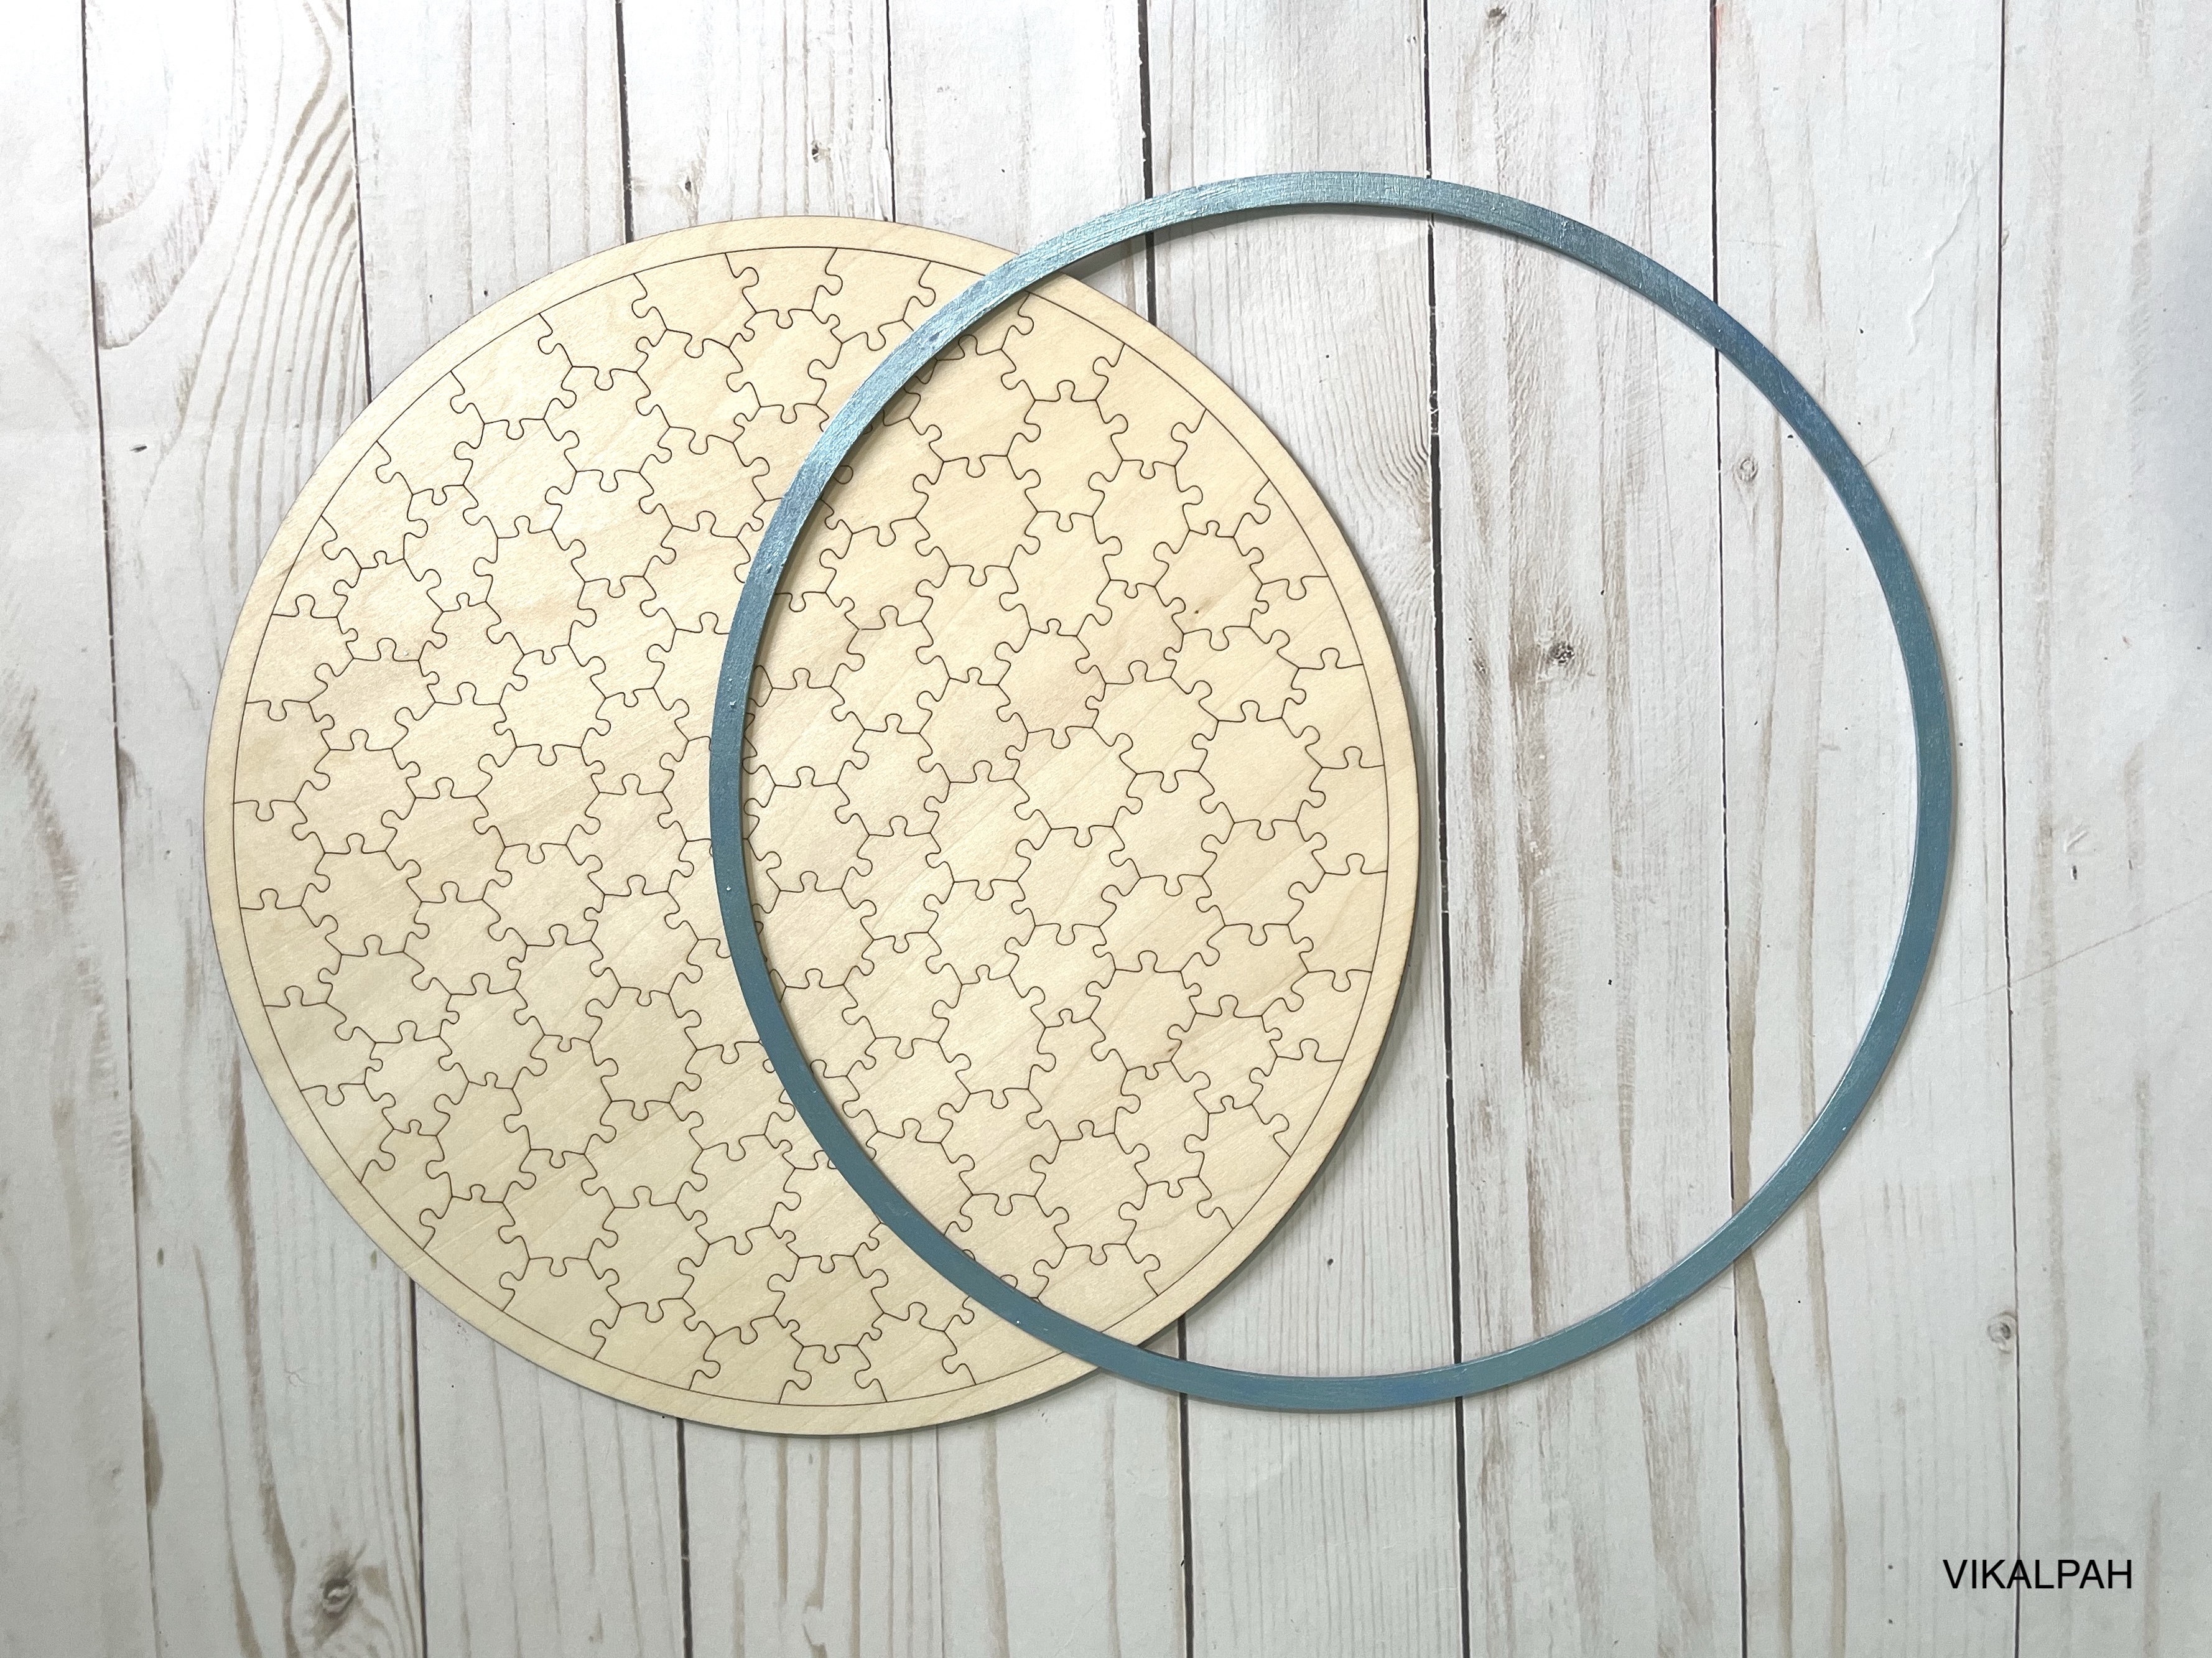
Cricket-themed Circle Jigsaw puzzle
My son loves cricket so much lately that I decided I had to create cricket-themed gift for his birthday this year. Since the normal puzzles are no longer challenging for him, I thought I would make a circle jigsaw puzzle. I came across the
Jigsaw puzzle generator while I was brainstorming ideas for the puzzle and it made the puzzle making so much easier as it generates SVG files to make the puzzle.
The only thing that I have to make is the picture. I thought I would make a collage of his favorite players. I used Canva to create the collage. I started with an 11-inch circle with a blue background as the base, and removed the background of the cricket players and added them to the circle. This was a perfect picture for the puzzle.
Material used :
Acrylic paint
Paint brush
Step 1: Import the picture into the XCS software. Copy the jigsaw puzzle template on top of the picture. Create an offset of 0.25 inch for the outer circle. Then align the picture's outer edge with the outer circle.
Step 2: Click Multi-module processing. Select the picture and click the inkjet module. Drag the intensity to 100. I sprayed with the Xtool Wood printing fixative spray.
Then select the jigsaw template and the outer circle, click laser on a flat surface, and then set the settings according to the material.
To create a base layer for the puzzle, you need to copy the jigsaw template and the outer circle on to another canvas and then set the outer cirlce to cut and the template to score.

Step 3: Now that the software part is done, the next step is the actual making part. To print, I first tried to place the wood onto the triangular prism, but the inkjet module moved the wood plank while printing so I had to cancel the process and then remove the prisms. Then, I place the wood plank onto the light grip cutting mat and process the printing part. Look at how crisp and neat the picture turned out.
Step 4: The challenging part of making this puzzle was to align the puzzle for the laser because the snapshot feature doesn't work on the app for me, and the puzzle cannot be laser processed on the mat. So I carefully moved the plank onto the baseplate and aligned the corners, marked the area (Circle )in the software, and then aligned the marked area to the puzzle template's outer edge and hit the start button.
To be honest, I was watching and praying that it should work, and it worked. The only thing I would change the next time is that I will reduce the power to 80 because the wood I used is not 3mm and it wasn't necessary to use 90 power as the wood pieces got stuck to the base plate and I had to use the knife like tool used for wedding the vinyl to pull the pieces out.
Step 5: Now, use another basswood plank to process the base layer of the puzzle.
Step 6: Paint the outer circle of the top layer and attach the outer circle to the base layer using super glue.
The laser-cut cricket-themed circle jigsaw puzzle is now ready to play. It was quite challenging for him to finish the puzzle without the base layer, so I modified the puzzle by adding a scored base layer, which helped him to finish the puzzle with little help. I printed the picture as such on a paper as a guide to help him solve the puzzle. What do you think about this cricket-themed puzzle? Would you buy one if it is up for sale? Share with me in the comments below. I really love the potential of the
Xtool M1 Ultra in bringing my dream ideas to reality.


I hope this post gave you an idea of how to create your own laser-cut puzzles using XTool M1 Ultra. Do check the Xtool website for all the cool laser machines. ,
If you are a homeschooling parent, you need to check Xtool Education to learn how laser cutters can be used to transform abstract concepts into tangible solutions, such as designing functional prototypes, engineering mechanical models, creating art, and enhancing learning across multiple subjects with tech tools, such as STEAM and maker education.
This post is a Collaboration with Xtool, however, all the opinions expressed are my own. By clicking the affiliate links above and purchasing, you are helping me grow, and it is not going to cost you anything. Thank you.


I’m really impressed by how you layered the basswood and used both cutting and scoring to create depth and texture. The combination of cutting, scoring, and engraving is a nice technique to give the puzzle an educational and tactile feel. It reminds me a bit of how levels are designed in Geometry Dash Lite — precision and layering to create a seamless, enjoyable experience. I might try a similar method for some custom puzzles for my nephews, maybe themed around their favorite games or cartoons.
ReplyDeleteWow, making a custom puzzle sounds like a blast! I mean, who knew that playing with wood and paint could make me feel like I’m in some kind of artsy reality show? Next thing you know, I’ll be trying to build a laser-cut mansion for my cat. 😂 Steal a Brainrot Script
ReplyDeleteThis is so cool! I've been wanting to try making a custom puzzle with my XTool M1 for ages. The step-by-step instructions are super helpful, especially the part about scoring. This is going straight into my bookmarks for future DIY projects! Sand Blast Block Puzzle
ReplyDeleteDelhi MBBS Admission Get admission into top government and private MBBS colleges in Delhi with expert guidance. Call +91 9355910738 for NEET counseling, eligibility, and fee structure assistance
ReplyDeleteACS Medical College and Hospital ACS Medical College & Hospital in Chennai is a reputed NMC-recognized institute offering quality MBBS and PG programs with modern facilities. For admission guidance, call +91 9355910738. NAAC A+ accredited, it ensures strong clinical training and academics.
ReplyDeleteEducation is all about finding the right balance between theory and practical knowledge. In today's competitive world, academic writing has become a crucial part of the learning process, especially in higher education. Whether it's crafting essays, research papers, or case studies, strong writing skills are essential for academic success.
ReplyDeleteFor students pursuing advanced degrees like an MBA, the pressure to produce high-quality essays can be intense. If you're feeling stuck or need expert help, MBA essay writing services from MyAssignmentHelp can provide you with personalized assistance. Their team of experienced writers can help you craft essays that are not only well-researched but also engaging and tailored to meet the specific requirements of your course.
Education is a journey, and sometimes having the right support can make all the difference!
What is the Cutoff Rank for KMC Manipal? Kasturba Medical College (KMC) Manipal is among India’s top private medical institutions. Known for top rankings and academic excellence, +91 9355910738, the college attracts NEET aspirants nationwide. Understanding its cutoff rank is key for MBBS admission planning.
ReplyDeleteWhat Are the Fees of MBBS at B.P. Koirala Institute of Health Sciences? Looking to study MBBS at BP Koirala Institute of Health Sciences? The total fee is approx ₹55–60 lakhs for 5.5 years. For expert guidance, call +91 9355910739. BPKIHS offers NMC-approved MBBS with English medium education and affordable tuition.
ReplyDeleteWhat is the fees structure of Chitwan Medical College? Chitwan Medical College offers world-class MBBS in Nepal with affordable fees, modern facilities & high FMGE results. Contact us at +91 9355910739 for guidance.
ReplyDeleteWhat is the fee structure of Karnali Academy of Health Science? Karnali Academy of Health Sciences is one of the top choices for MBBS in Nepal due to its affordable fee structure, experienced faculty, and modern facilities. For details, call +91 9355910739, and explore your medical future with a recognized and reputed institution.
ReplyDeleteMBBS in National Medical College Nepal MBBS in National Medical College Nepal offers modern facilities, NMC and WHO recognition, and an Indian-friendly curriculum. Call +91 9355910739 for guidance.
ReplyDeleteHow can I get admission to Karnali Academy for MBBS? Karnali Academy of Health Sciences (KAHS), Jumla, is a government-run medical college in Nepal offering affordable and globally recognized MBBS programs with rural healthcare exposure. For admission guidance, call +91 9355910739.
ReplyDeleteIs NIMS Medical College Jaipur good? NIMS Medical College Jaipur is a top choice for students seeking MBBS in Rajasthan. Known for its advanced facilities and quality education, call +91 9355910738 to learn more about admission, ranking, fees, and eligibility criteria.
ReplyDeleteIs Hostel Compulsory in Kathmandu Medical College? Get details on Kathmandu Medical College ranking, fees, reviews, admission & hostel. Call +91 9355910739 for MBBS in Nepal guidance today.
ReplyDeleteIs Gandaki medical college good for MBBS? Gandaki Medical College offers excellent MBBS education, +91 9355910739 with skilled faculty, advanced facilities, and strong career opportunities.
ReplyDeleteCan I Ask Google to Recover My Account? Losing access to your Google account can be one of the most stressful situations in the digital age. Your Google account is not just an email address; it often connects to Gmail, Google Drive, Google Photos, YouTube, Play Store, Docs, and even third-party logins. If you lose access, it feels like losing a key to your digital life. Many people ask: Can I ask Google to recover my account? The answer is yes — Google does provide ways to recover accounts, but the process is step-by-step and requires proof that you are the rightful owner.
ReplyDeleteThis is such an inspiring guide. The step-by-step approach makes it so easy to follow. For those looking to balance creativity with precision, Qatar Assignment Help can take your Assignment to Achievement journey to the next level!
ReplyDeleteThey say never meet link your heroes. I've met a few of mine. Sometimes it's been great – especially for people in the watch space that I admire – but reality rarely meets link expectations. That's why I was link nervous about seeing Cartier's Privé Normale. My skepticism was unfounded. The new Normale is awesome.
ReplyDelete
ReplyDeleteCinema HD v2 is a popular third-party streaming application designed to provide free access to a wide range of movies, TV series, and other entertainment content in high definition. Its popularity stems from its simple interface, smooth performance, and extensive media library that updates frequently with the latest releases.
This guide to creating custom laser-cut puzzles with XTool M1 Ultra is fantastic! Can't wait to try it for my kids. For some fun gaming, check out the colorful fruit puzzle on スイカゲーム Suika Games!
ReplyDeleteAce the 312-39 - Certified SOC Analyst (CSA) using proven practice tests. Boost your cybersecurity skills, gain confidence, and pass easily with targeted prep. Start your success journey today!
ReplyDeleteExcellent! We also provide premium-quality accessories through Icon Automated Solutions. Designed every product to make your tasks easier and faster at fair prices.
ReplyDeleteLaser Hair Removal vs. Waxing: A Cost Comparison Over 5 years | EaseMyCure
ReplyDeleteDiscover the long-term costs of laser hair removal compared to waxing, and find out which option is more cost-effective for you. Read more at EaseMyCure! Laser Hair Removal vs. Waxing
Helpful post! For services check GST Registration in Madurai, OPC Registration in Madurai, LLP Registration in Madurai, Private Limited Company Registration in Madurai, Trademark Registration in Madurai.
ReplyDeleteStruggling to turn your website visitors into paying customers? Finding the < href="https://melbourneseoexperts.au/melbourne-copywriter/">right writers for small businesses in Victoria is the missing piece of your marketing puzzle. At Melbourne SEO Services, we connect you with professional copywriters who understand the unique challenges of the Victorian market.
ReplyDeleteCreating customized laser-cut puzzles requires precision, attention to detail, and the ability to translate creative concepts into physical products that meet exact specifications. This process mirrors the approach needed when implementing technology solutions in business: careful planning, accurate execution, and consistent quality control. For organizations seeking to integrate tracking and monitoring systems, the same principles of precision and reliability apply. Exploring the website of experienced solution providers can help you understand how to apply these principles to your own operations. Whether you're creating products or managing processes, the tools you use must deliver consistent, reliable results. Technology that supports your goals without adding complexity is key to maintaining focus on your core mission. Precision in execution leads to excellence in outcomes.
ReplyDeleteModernising your heating setup with a Boiler Conversion service can improve comfort and energy efficiency in any property. Whether upgrading from an old conventional system to a combi boiler or changing outdated equipment, professional conversions can reduce bills and create more space.
ReplyDeleteSuch a useful and informative article. Keep sharing more like this! jade stone
ReplyDeleteThe article beautifully demonstrates how modern laser cutting tools like the XTool M1 Ultra can transform simple ideas into highly personalized, meaningful creations. What stands out is the blend of creativity and precision—turning everyday images into interactive puzzles that are both educational and emotionally engaging for kids and adults alike. It’s a great reminder that technology, when paired with imagination, can elevate DIY projects into unique, handcrafted experiences that carry both learning value and personal touch.
ReplyDeletedallas web development companies
digital marketing outsourcing services
tradie estimating software
W2S Solutions is a leading engineering, digital transformation, mobile app, and web development services. We build intelligent AI-powered solutions that help enterprises automate operations, enhance customer experiences, and make data-driven decisions. Partner with us to turn innovation into measurable business growth.
ReplyDeleteStudents considering MBBS in Russia should take time to compare universities, understand the admission requirements, review the curriculum, and estimate the overall cost of studying abroad. Making an informed decision after researching multiple reliable sources is always beneficial. I've found that platforms like EducationVibes, along with official university websites, can be useful for understanding the process and exploring available options.
ReplyDeleteNice article and easy to understand. My friends and I sometimes compete to see who can get the highest clicking score. We used this click speed test. It measures clicks in a fixed time and gives instant results. The tool makes it easy to compare scores and track changes between different attempts.
ReplyDeleteDieser Beitrag über die Herstellung eines individuellen Laser-Cut-Puzzles ist wirklich inspirierend! Ich finde es beeindruckend, wie aus einer kreativen Idee und moderner Lasertechnik ein einzigartiges persönliches Kunstwerk entstehen kann. Besonders spannend ist die Möglichkeit, eigene Designs, Fotos oder besondere Motive in ein Puzzle zu verwandeln, das nicht nur Spaß macht, sondern auch eine schöne Erinnerung darstellt. Solche individuellen Projekte zeigen, wie viel Kreativität in handgefertigten Geschenken steckt. Wer gerne neue kreative Ideen ausprobiert und dabei Wert auf besondere Erlebnisse legt, findet immer wieder interessante Inspirationen. Ähnlich wie bei casinacho, wo einzigartige Konzepte und Unterhaltung miteinander verbunden werden, geht es auch hier darum, etwas Persönliches und Besonderes zu schaffen. Vielen Dank für die ausführliche Anleitung – sie macht Lust darauf, selbst ein eigenes Laser-Cut-Puzzle zu gestalten!
ReplyDelete