


This post may contain affiliate links.By clicking the link and purchasing items through my links doesn't cost you anything but I receive a small commission.The money helps me buy craft supplies to bring you new creative ideas each week.
I was going through my Pinterest feed and saw a pencil case picture from Mochi things.That caught my eye and I fell in love with those square pencil case. I had no idea to buy those pencil case as $25 for pencil case does not sound great to me ;). Are you with me ?? But I thought I can DIY a similar version to satisfy my love for the pencil case. Oh yes !! I can use them to hold my sharpies or other pens even though I am not going back to school :).
It's been a long time since I shared a no-sew version of fabric DIYs after I got a sewing machine. So, I thought I will make this pencil case a no-sew version and give a try with fabrics I had in hand and it worked.Happy dance !! So, let's see how to make it !!

Materials Required :
A cereal box
1/4 yard of patterned cotton fabric
1/4 yard of felt
Glue (E 6000 or Tacky glue)
Fabric scissors & Paper Scissors
Pencil & Ruler
Magnetic clasp or Velcro
Craft knife

Step 1: Cut one side of the cereal box measuring 7" X 11" and two pieces measuring 1.75" X 3.25" from the other side. Fold and crease the rectangle at following measurements from the top 3" - 4.25" - 7.25" - 8.5". Shape the corners of the front side of the case using scissors if desired.Cut the side panels as shown below with 0.25" on sides and bottom for folding.


Step 2: Cut the fabric pieces in such a way that it measures approximately an inch larger than the cardboard pieces.

Step 3: Apply glue on the corner of the large cardboard piece and glue the fabric to it. I used E6000 for one case and tacky glue for another (Just to test). Both work great. Also use the print side of the cereal box showing inwards, because the print in the cereal box peeks through the fabric slightly, if that doesn't bother you, then its okay. I am using it outwards here as it will easy to explain in the pictures.

Step 4: On the inside, glue the corners as shown first and then glue all the other sides. Repeat the same procedure for the side cardboard pieces too.


I was going through my Pinterest feed and saw a pencil case picture from Mochi things.That caught my eye and I fell in love with those square pencil case. I had no idea to buy those pencil case as $25 for pencil case does not sound great to me ;). Are you with me ?? But I thought I can DIY a similar version to satisfy my love for the pencil case. Oh yes !! I can use them to hold my sharpies or other pens even though I am not going back to school :).
It's been a long time since I shared a no-sew version of fabric DIYs after I got a sewing machine. So, I thought I will make this pencil case a no-sew version and give a try with fabrics I had in hand and it worked.Happy dance !! So, let's see how to make it !!

Materials Required :
A cereal box
1/4 yard of patterned cotton fabric
1/4 yard of felt
Glue (E 6000 or Tacky glue)
Fabric scissors & Paper Scissors
Pencil & Ruler
Magnetic clasp or Velcro
Craft knife

Step 1: Cut one side of the cereal box measuring 7" X 11" and two pieces measuring 1.75" X 3.25" from the other side. Fold and crease the rectangle at following measurements from the top 3" - 4.25" - 7.25" - 8.5". Shape the corners of the front side of the case using scissors if desired.Cut the side panels as shown below with 0.25" on sides and bottom for folding.


Step 2: Cut the fabric pieces in such a way that it measures approximately an inch larger than the cardboard pieces.


Step 4: On the inside, glue the corners as shown first and then glue all the other sides. Repeat the same procedure for the side cardboard pieces too.


Step 5: Attach the magnetic clasp to the front bottom of the case and cut the felt for inside of the case with the same measurements reducing around 0.1" all sides. Attach the other part of the magnetic clasp to the felt piece. Make sure that the clasp is attached at the right place to ensure closing when the pencil case is done.(Detailed steps for attaching magnetic clasp, explained here)


Step 6: Glue one side of the side panels to the sides as shown and the glue inner felt piece. Once it is dry, glue the bottom and the other side of the side panel to the main piece. Use a binder clip to hold it in place and then you are done. Once it is dry, your new square pencil case is ready to enjoy !!


This is my trial version of the square pencil case, I used pleather/ vinyl for inside instead of felt but the areas where the glue applied was wrinkly and it was obvious that glue has been applied.That is the reason I switched to felt.As said earlier, I used the printed side of the cereal box for outside and the prints were showing through.So, I recommend using a darker fabric or use the inner side of the cereal box as outside.


 |
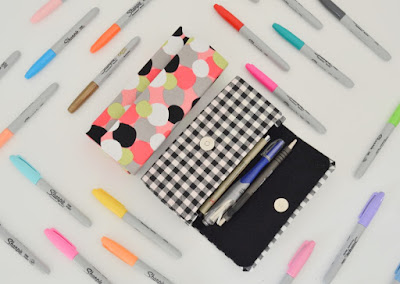
| This case can hold quite a lot of supplies. |

Hope you enjoyed this simple DIY. Share what you think in the comments below. As always I will be happy to hear from you.
Other Cereal box crafts you might like:


