Showing posts with label Christmas crafts. Show all posts

Tuesday, December 10, 2019

DIY Acrylic poured big wood ornament

I got a pouring medium sample from the Plaid crafts company and wanted to try acrylic pouring with that for the past two months. .I wanted the project to be published in the mid of November, so I thought I will do a Christmas themed one. I came across this big wood sign ornament from Dollar tree and wanted to try acrylic pouring on that but I could get only one as it was out of stock. I was positive I could find another one in some other Dollar tree shops. But I wasn't lucky enough so I gave up on that project. Last Friday, When I went to the Dollar tree I came across the same wood sign and grabbed to try this. So I tried it this weekend and here is how it turned out.  

Acrylic pouring on wood ornament for christmas in red shades using pouring medium from plaid


Materials Used:
Big ornament shaped Wood sign
Acrylic paints
Pouring medium
Paper cups & popsicle sticks for mixing 
Trash bags or Newspapers for protecting the surface. 
Ribbon and glue (optional) for decoration

Step 1: Mix equal parts of pouring medium and paint in cups. Do this for all the colors you want to use. 


Step 2: Pour a little bit of each paint one after the other in a separate cup. I made sure to alternate between dark and light colors. 


Step 3: Since I tried the straight pour last time when I tried acrylic pouring, this time I tried dirty pour and flip cup method combined. For this, after pouring the paints in a separate cup, I placed the wood sign on top of the cup and flipped it so that the paint gets transferred onto the wood surface. 


Step 4: Swirl the paint around to cover the wood sign. Mix some more paint to cover the areas where the paint did not reach and swirl it again. Place the sign on top of something high so that the excess paint drips and the sign dries. It took around 8 to 10 hours to dry completely. 


I also tried dirty pour on 2 square panels to finish the mixed paints. 


Step 5: Add any decoration as desired. I used hot glue and ribbon to decorate the corners of the ornament and then made a loop to hang with another ribbon. Used the same type of ribbon and covered the top to look like an ornament. I also added two jingle bells at the bottom using some sewing thread to add some sweet touch to the ornaments ;)


How fun and simple was that? This is a totally fun project that you can do to decorate your house. If you are looking for something out of the ordinary to decorate your house for holidays or parties, this is a must-try. You can add some vinyl words in the middle to make it a signboard since I wanted to highlight the marble effect from pouring I left as is. You can refer to my previous project on how I added a decal sticker to make the acrylic poured wood panel as a wall decor piece. 


Wednesday, December 13, 2017

DIY ideas to embellish gifts using tape

It's been a long time since I posted a gift wrapping idea so I thought I will share some ideas to embellish your gifts using tape. This will come handy to you when you don't have any ribbon or you ran out of ribbon or just want to try something different to decorate your gifts. These ideas will not only help you survive this holiday season but it will be useful year long.

Use tape to make ribbons

Wednesday, December 6, 2017

DIY Ornaments using pom pom

Are you looking for ornament ideas to fill your Christmas tree? You have come to the right place. I am sharing three simple ideas for clear plastic/glass ornaments using pom pom as fillers. Without much ado, lets get to the making.  

clear ornament ideas using pom pom

Thursday, November 16, 2017

DIY Wall art using Sequins

Last year, I made embroidery ornaments for Christmas using wood burning tool and this year I wanted to experiment some other way of using the tool. Long time ago, I saw an project around the internet where they used a page protector and wood burning tool instead of using fuse tool to create compartments in page protector. The idea was on my ideas-to-try list for long and I finally tried it. Here is how you can use the idea to make a wall art using sequins.

Alternate use for wood burning tool as fuse tool

Wednesday, December 14, 2016

DIY Flower pot Christmas tree decor

This idea of flower pot Christmas tree came to mind when I saw mini ornaments in "Merry minis" section of Michaels Craft store. They were so cute, tiny and sparkly that I wanted to get them and use it as Christmas decor. So I thought, why shouldn't I make my own tree to hand these ornaments which resulted in the flower pot Christmas tree.You can even make your own tiny ornaments if you can't find these mini ornaments. I did not have enough time to make my own mini ornaments so I ended up using only the ones I bought at the store. Let's see how. 


Christmas tree decor using flower pot

Wednesday, December 7, 2016

DIY Holly Garland

 Have you started decorating for Christmas? Today I am sharing a simple DIY that is perfect for your Christmas decoration. You can use it to decorate your mantel or staircase or anywhere you desire. Let's see how.


how to make a holly garland using cardstock and pompoms

Wednesday, November 23, 2016

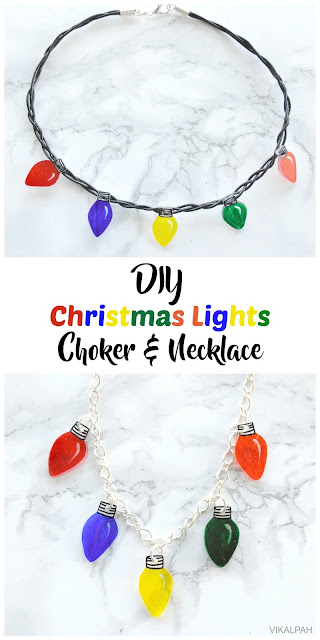
DIY Christmas lights Choker & Necklace

This random idea of Christmas lights necklace popped in my head last week when I was thinking about Christmas decor and other things. I thought this is a perfect idea and had to share it with you all. When I was brainstorming ideas for materials to use, Shrinky dinks was calling my name. So, I using it to show you how to make DIY Christmas lights jewelry. Let's get started. 

How to make christmas lights jewelry using shrinks sinks

Wednesday, November 16, 2016

How to make Shaker cards

It has been a tradition here on my blog that I share a card making tutorial every year during Christmas time. Following the same, this year I am sharing yet another interactive card. It is so easy and liked by people of all ages. I am sure whoever gets a shaker card, you will get to see the inner child in them  at least for a moment while they enjoy the card. Without much ado, let's get to the making.

DIY Christmas shaker card

Wednesday, November 9, 2016

DIY Embossed Christmas Ornaments

Last week, I shared this DIY Embroidery ornament using the wood burning tool. This week, are you ready to make another interesting ornament for your Christmas tree? It is so simple and easy to make. All you need is puffy paint, acrylic paint and of course a plain plastic or glass Christmas ornament. Let's see how.


Embossed Christmas ornaments using puffy paint

Wednesday, November 2, 2016

DIY Embroidery Ornaments

When I get a craft tool, I would think that I should get the most use out of it instead of just one or two projects. With that said, I always think about various uses for the wood burning tool I have. I have already shown you around 5 to 6 projects using the tool and I also showed you my first try with the wood burning tool. Today, I have come up with another idea of using embroidery and wood burning together to make DIY embroidery ornaments. Let's see how.

How to diy ornaments to put embroidery

Monday, December 14, 2015

DIY Reusable gift tags using air dry clay

Paper gift tags are often thrown away once the recipient consumes the gift . How about making gift tags that can be reused as ornaments next year or as fridge magnets, will it not be a cool idea? This gift tag idea is suitable around the year and it is so easy and quick to make. Let's see how.


Materials Required :


Step 1: Take a piece of clay from the package and roll it flat using a rolling pin.


Step 2: Use cookie cutter to cut a shape for making gift tags. Or you can even use blade and cut any simple geometric shape to make your gift tag.


Step 3: As Christmas is approaching, I made few Christmas themed gift tags.


Step 4: To make it more interesting, add few rhinestones to the gift tags. Just press them wherever you think they are appropriate. Glue is not required. Use a ball tool to engrave your personalized message, add details like eyes and other decorative elements. Use a straw or a small cookie cutter to make a hole on top to string a ribbon. Allow the gift tags to dry. It will take a day to dry completely (depending on the thickness). String a piece of ribbon on top and secure it with a knot.Your gift tag is now ready !!


Here is the close up of the snowflake gift tag. If you don't have ball tool, you can even use a toothpick or even a bobby pin to add finer details as shown here.

If you know someone who is celebrating their birthday on Christmas day, you can also use the ball tool and engrave "Happy Birthday".


And use paint pens to decorate the front of the gift tags.


I also tried the image transfer technique to add more personalization to the gift tag. To do this, just print your photo on plain copy paper using an inkjet printer. Just press the photo on the wet clay and leave it for 20- 30 seconds and remove them.You will get a light imprint of the image on the clay. Be sure to flip the image before printing. You can use markers or paint pens to add any message on top once it is dry. Add a ribbon on the back with a piece of tape so that the recipient can use them as fridge magnets if they want to.


Here is another close up shot of how I used the image transfer technique to make a personalized gift tag for an "Anniversary gift".


If you want, you can also highlight the engraved details using marker or paint pens. I hope you enjoyed these easy peasy reusable gift tags using ACTÍVA Products Plus air dry clay.


I made these using air dry clay but you can use the same technique to do gift tags using polymer clay if you want to make colorful and quick gift tags. As air dry clay takes a while to dry , you can use polymer clay and bake to make it hard if you want a quick gift tag using this technique. You can even use thumb prints of yours or even hand prints of babies(May be for grand parents :)) if you want to take the personalization to the next level.

Hope you will give this a try and add more personal touch to your gifts this holiday season. Share what you think about this idea in the comments below. As always I will be happy to hear from you. Be sure to share a picture with me in any of my social media if you happen to make these. I would love to see your creations and share it with other readers. 

Disclaimer: This is a sponsored post by Activa products for making a guide in guidecentral.However all the ideas shared are my own. 

Wednesday, December 9, 2015

DIY "pull up" Snowman gift card holder

A good handmade card is always appreciated even though cards have been replaced by e-cards, whatsapp messages and emails.Today I am sharing how to make a cute interactive snowman gift card holder that will sure win many hearts. Lets see how. 


Material required :
Blue Card stock
Co-ordinating scrap book paper
White card stock
Color markers or printer
Brads (Paper fastener)
Craft knife
Double sided tape
Double sided foam stickers
Scissors
Pencil

Step 1: Cut 12" X 3.5" blue card stock and 5" X 3.45" co-ordinating scrap book paper for the front. Measure 5" and fold the card stock lengthwise and fold in the remaining 2" inside to create a pocket for gift card holder. Use double sided tape on side to secure the pocket. Glue the front scrapbook paper using the tape.


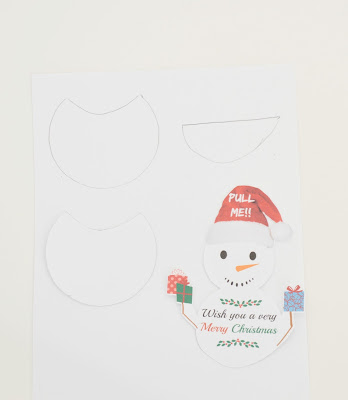
Step 2: Draw or print a snowman in card stock . I designed mine using picmonkey and cut it with my electronic die cutting machine but you can make your own and cut it with craft knife if you don't have cutting machine.


You can download this image,print and cut it with craft knife to use in the card.


Step 3: Once the snowman outline is cut, cut the bottom part of the snowman as shown. Trace the bottom part and half of the second circle as shown below. Cut them using scissors or craft knife. Now you will have two bottom pieces, one 2/3 of snowman and half of the second circle.


Step 4: Take one bottom part piece and make a small cut line in the middle for the brads to move up and down while you pull up the snowman.I dint have brads to use in the card so I used a part of snap button instead.So I poked a small hole in the bottom part of the half circle piece.If you are using a brad, poke it in the same place and pass it through the middle cut line and bend it.  


Step 5: Now stick some double sided foam sticker around the bottom part and glue it to the front of the card. Take 2/3 of the snowman and glue it to half circle piece using tape. If you are using snap button like me, the small point in the middle will be poking so I suggest it is better to use a brad. As I did not have one in hand I used a part of snap button. 


Step 6: Use foam stickers only in the bottom part and stick the card stock piece on top.Now your pull up snowman card is ready. Isn't it cute?


You can even make this as normal card and create a scene with three snowman instead one and do this pull up for one of the snowman.It will look cute too. If not for christmas, you can incorporate this idea for any occasion. For example, you can make three tier birthday cake like this and write Happy birthday in the middle like we did for this card. The options are endless as I always say. Try it and let me know how it turned out for you. As always I will be happy to hear from you, so please share your comments below. 

If you want full size card, you can check out last year's Snowman penny slider Christmas card.