


Following the craft trend of paint pouring, I wanted to try my hands on paint pouring so here I am with the first post of the year on how to paint pour with acrylics and Mod Podge. As I have lots of acrylic paints and Mod Podge, I wanted to try the paint pouring with the materials I have on hand without having to buy separate paints or medium sold for this craft. Let's see how I did.

Materials Used:
Square wood panel
Acrylic paints
Mod Podge
Water
Cups & sticks for mixing
Painter's tape(Optional)
Paint brush (Optional)
Wall decal or Vinyl letters (Optional)
Newspaper or trash bags to cover the work surface
A cardboard box or anything of that sort to elevate the panel for drying
Step 1: Squeeze acrylic paints of your choice into the cups. I chose 6 colors but it is up to you to chose how many colors you want and first I selected 3 colors and then I went with shades of that color for the next 3 colors. Like Coral - Orange, Yellow - Beige and 2 shades of blue.

Step 2: Add twice the quantity of mod podge to the paint you squeezed. The quantity need not be very accurate.

Step 3: Add a little bit of water to each cup. Approximately to the quantity of the paint, you added to make it to the pouring consistency. Mix it well with the stick.

Step 4: Start pouring the paint one by one onto the wood panel until you feel you have enough paint to cover the panel.


Initially, I thought I will try the dirty pour(Pouring the paint one by one into a cup and then pouring the paint mixture onto the panel/canvas) but when I attempted to pour the paint into a cup one of the paint started to mix with the other as the consistency was very watery. So, I changed my mind and attempted to do straight pour method. (Pouring the paint one by one directly onto the panel/canvas)
Step 5: Swirl the paint to cover the whole panel. Add more paint to the blank areas and repeat the process until you get the desired look. I used the paint mixture I tried to do dirty pour to cover the blank areas. Once it is complete, place the panel elevated so that all the excess paint drips down. I used a cardboard box for this. Allow it to dry for at least 24 hours. Mine was completely dry to touch in 24 hours but I think it varies depending on the thickness of the paint settled on the panel.


Also, I used the remaining paint to cover the scrap wood panel from one of the previous failed project. I really liked how the second pour turned out. I did not film this as my son woke up in the middle of his nap. (Real life mom problems you see 😁)

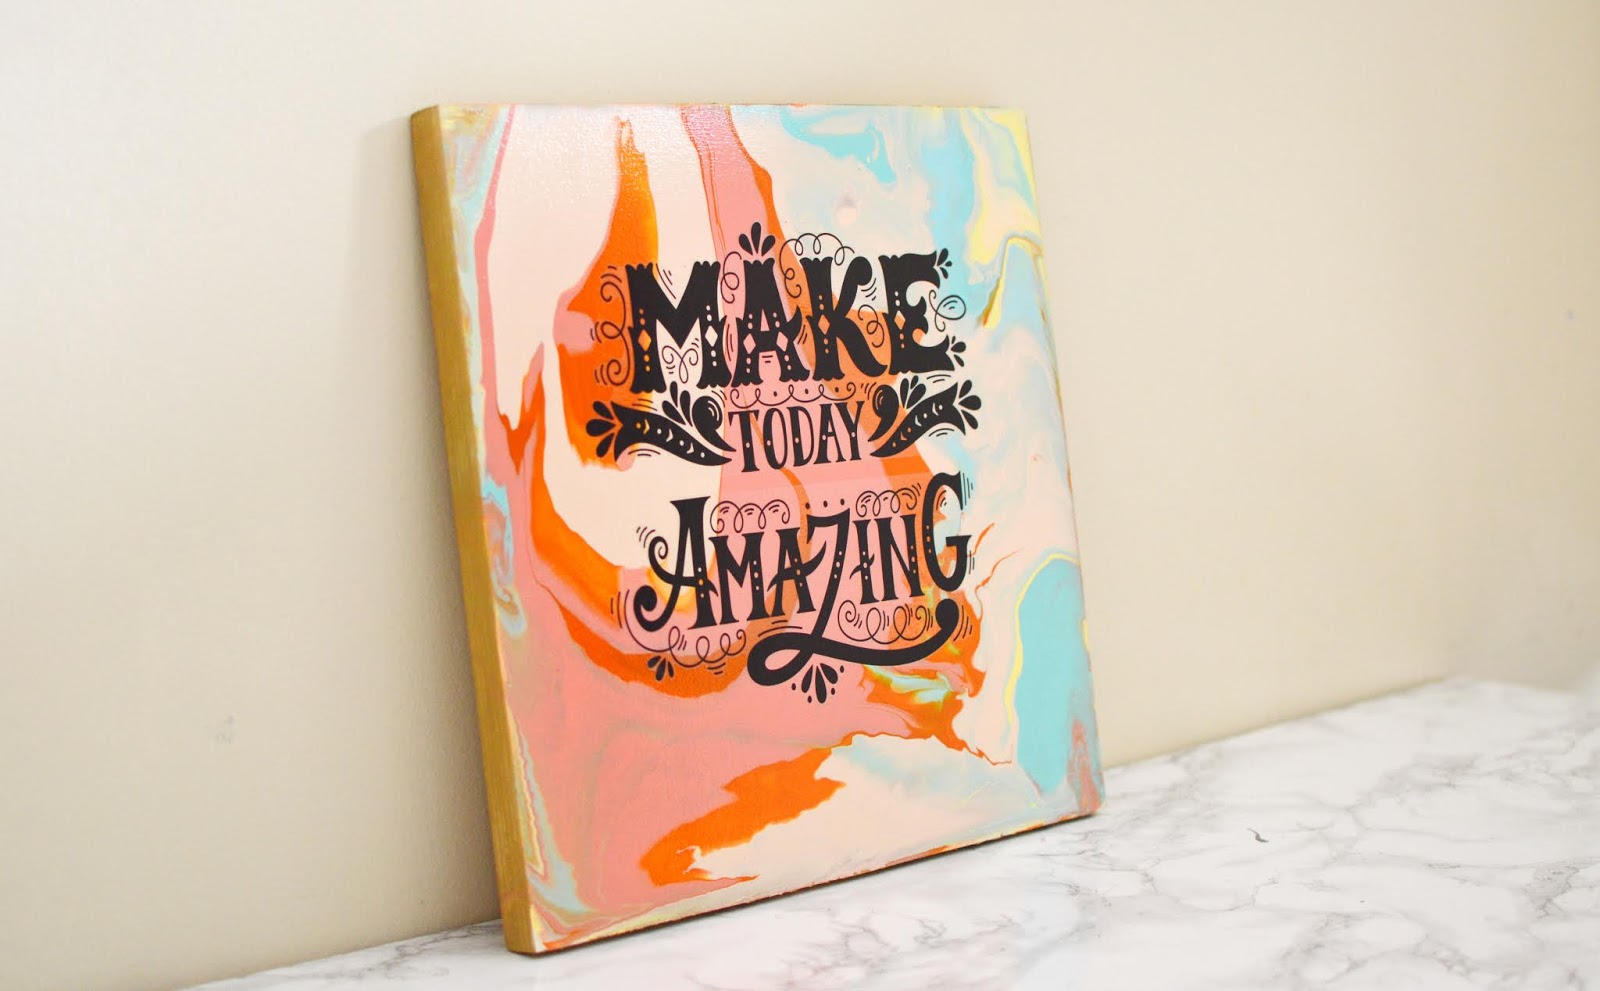
Paint poured panel/Canvas itself is an art and you can display it as such. I added a couple coats of gold paint to the edges of the panel.


To add more beauty to the art, I used a temporary wall decal from the dollar store and pasted it on top of the paint poured art. When you want to change the quote you can just remove the sticker. How easy?? To be honest, I love it more compared to the blank one. Let me know in the comments which one is your favorite.

Below is the video of this paint pouring art. Do watch and share your thoughts in the comments.
I like with the decal the best too. The paint makes for a pretty background to the decal. #HomeMattersParty
ReplyDeleteI like it with the decal! Can you use this also on card stock for greeting cards?
ReplyDeleteGorgeous. I wonder if it works using metallic paints. Did you use a block of canvas?
ReplyDeleteYour acrylic pour turned out nice! I like the colors you chose and adding the decal. #homemattersparty
ReplyDeleteYour project looks great. I searched “How to use Mod Podge as a pouring medium and your this blog post popped up!
ReplyDeleteYour online casino will become more efficient and profitable thanks to casino api, which provides access to various gaming platforms, supports modern management tools and allows you to quickly connect new payment systems. Intuitive setup and professional technical support help minimize time costs. This solution is ideal for operators who want to increase their attractiveness to players, offering first-class functionality and smooth operation.
ReplyDeleteGuten Tag, ich bin auf der Suche nach einer seriösen Firma, die sich auf das Erstellen von wissenschaftlichen Arbeiten spezialisiert hat, insbesondere Bachelor- und Masterarbeiten. Ich würde gerne wissen, ob es Unternehmen gibt, die professionelle Unterstützung für Studierende in diesem Bereich bieten, sei es beim Schreiben, Korrekturlesen oder der Datenanalyse. Wichtig wäre es mir, dass die Qualität der Arbeiten hoch ist und dass die Dienstleistungen zuverlässig sowie termingerecht erbracht werden. Wer hat Erfahrungen mit solchen Anbietern oder kann eine Empfehlung aussprechen?
ReplyDeleteEs gibt immer wieder Situationen, in denen Studierende vor der Herausforderung stehen, ihre Bachelorarbeit zu schreiben, aber nicht die nötige Zeit oder die erforderliche Expertise besitzen. In solchen Fällen kann ein Ghostwriter eine wertvolle Hilfe sein. Ghostwriter https://ghostwriter-österreich.at/bachelorarbeit-schreiben-lassen/ bieten nicht nur Unterstützung beim Schreiben, sondern garantieren auch eine hohe Qualität und Professionalität, was besonders bei einer Bachelorarbeit von Bedeutung ist.
DeleteIch danke Ihnen!
DeleteGreat post! It's really helpful for students exploring career options in Australia. I’ve heard a lot about how strong the University of Melbourne placements are, especially in fields like engineering and business. Their industry connections and internship support seem to give graduates a solid head start in the job market.
ReplyDelete