Showing posts with label Silhouette projects. Show all posts

Monday, December 30, 2019

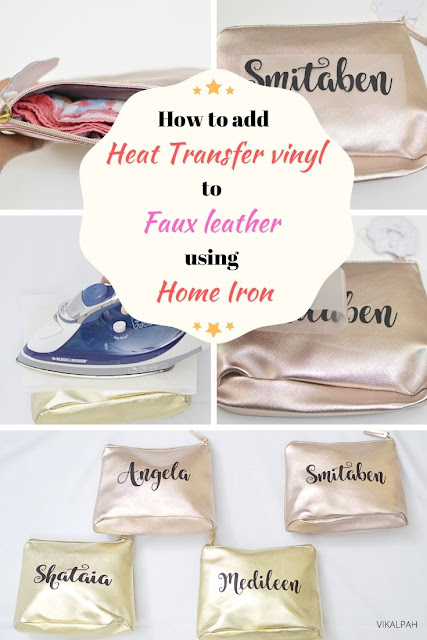
How to add heat transfer vinyl to faux leather using home iron


I came up with this idea of personalized purses when I was brainstorming gift ideas for my son's daycare teachers. I wanted a simple personalized gift in which I can add the gift cards to give it to the teachers. I came across these gold and rose gold purses in Target's bullseye playground and instantly grabbed 4 of them. (No! I'm wrong!) To be honest, I did hesitate a little bit as I have never used HTV on faux leather but you know I love challenges. I put up a post on the Silhouette cutting machine group whether this will work and got a response from a person that" It will melt".And I was like "Ah! It looks like I need to return them back and look for another gift." 
Then I searched in google looking for a tutorial on applying vinyl to faux leather. I came up with a tutorial but they were using the Teflon pillow and Teflon sheet to protect the faux leather and I don't have those and also don't want to buy them just for this project. Then I searched for an alternate solution and ended up in a tutorial where the person uses parchment paper but she used htv on a real leather notebook. I thought why not give a try and decided to try it with parchment paper and a towel inside the purse and it worked. What I learned from this project is there is no need to purchase every new item described to try a new project. Experiment with what you already have on hand. Do you agree? Now let's see how I added Heat Transfer vinyl to faux leather using Home Iron. 

How to add heat transfer vinyl to faux leather using home iron & parchment paper

Wednesday, January 31, 2018

DIY Birth stats canvas from baby's first art

This post may contain affiliate links.By clicking the link and purchasing items through my links doesn't cost you anything but I receive a small commission.The money helps me buy craft supplies to bring you new creative ideas each week. 

Have you ever tried to make art or craft with your baby? I tried the popular baby's art project with my 7-month-old son and it turned out super cute. I wanted to have it as a keepsake so, I turned it into his birth stats canvas using an electronic cutting machine. Don't worry if you don't have an electronic cutting machine, you can still use other supplies to make this birth stats canvas. (scroll down)Now, let's see how to do the canvas. 


Baby's painting into wall art using silhouette

Wednesday, February 8, 2017

How to convert simple drawings into stipple art using Silhouette Curio

Today is really exciting as I am sharing my first project using Silhouette curio. It is an electronic cutting machine just like Silhouette portrait or Silhouette Cameo but in addition to cutting it also does other cool things like etching, stippling, embossing, debossing, etc. I have been owning this machine for the past year and I feel bad to say that I haven't used it much as my first try with this machine was a major fail. I purchased a lot of new things to try with this machine in thanksgiving day deals but never got around to it.  I tried to cut leather for this project but it ended up it tearing the leather as well as the cutting mat. Later, I learned the mistake was with the blade(Returned and got a new blade) as well as with the leather.

Finally, after a year I made up my mind to try another project which also ended up in failure. It is an etching project. It wasn't a total fail but the result was not what I expected and it was taking a lot of time to perfect. Never got the result even after many tries. So I gave up that and then moved on to try stippling. Well, First try with this wasn't smooth either but on my second try, I got what I wanted. It was a great success so I am super excited to share with you all.

I don't know whether it is with the machine or it is something I am doing wrong.I always felt very comfortable working with Silhouette portrait but trying my best with the curio. Hope one day I will get comfortable with it to share more projects with you all.( If you are a curio user, would love to hear your experience in the comments below). For now, I am excited to share the stippling art I made and what worked for me. Are you ready?

How to convert simple drawings into stipple art using Silhouette curio

Wednesday, January 4, 2017

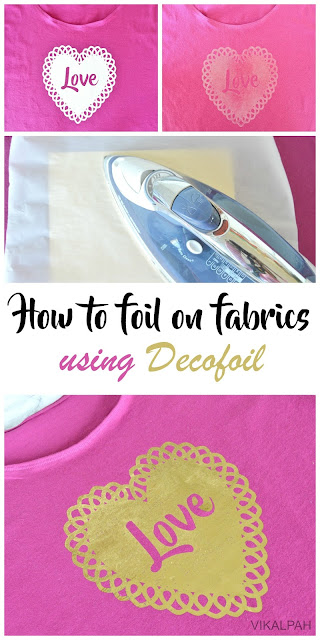
How to foil on fabrics using decofoil

So, this deco foil project has been on my to-do list for a long time and I finally got to trying it this week. I know that the Deco foil brand has a product called 'hot melt adhesive' to use with deco foil transfer sheets. I got a pack of 5 transfer sheets one and half years ago I think. For some reason, I always wanted to test these transfer sheets using heat n bond iron on adhesive that I already had on hand because 'Hot melt adhesive' looks so similar to the heat n bond iron adhesive that I don't want to hoard one more product just for one project.  I haven't seen the product in person but I am just guessing it from the product description. So let's see if it worked or not.

Foiling on fabrics using Decofoil transfer sheets

Wednesday, December 21, 2016

DIY round Perpetual Calendar with free printable template + free cut files for Silhouette

I love perpetual calendars. I have already shared two of those in the past two years. Following the tradition this year, I came up with the idea of a round perpetual calendar. When it comes to crafts, I always love making stuff with the hand rather than designing them digitally and putting it together. But this idea requires some designing. It is not that it can't be done with just paper and pen, the outcome will be neat and crisp if it is done digitally. So I took the challenge and started designing the calendar in Silhouette software. I don't know illustrator or photoshop much so I went with the Silhouette software for designing.Even though I am not a PRO at designing in Silhouette software, I had that confidence that I can pull this idea together as I have done a couple of projects in the software. It took me five trials to get it right and I am so happy with the result. I am sharing a free template(Which doesn't require Silhouette) and also a cut file which you can use with the Silhouette.Without much ado, let's get to the making.

How to make a round perpetual calendar using silhouette or printer

Wednesday, October 12, 2016

DIY Halloween Luminaries

Last year, I made DIY flameless fire pit for Halloween. Since then I had a set of six LED candles lying around. So, I thought I should come up with some sort of DIY to use them again this year. Finally, I ended up making DIY Halloween luminaries. These are easy to make and you don't have to worry about fire at all ;).


Wednesday, July 6, 2016

DIY Color Changing T-Shirts

While I was online shopping for blades, tools, and other silhouette related stuff in silhouette website during Black Friday deals last November, I came across something called "UV light sensitive fabric ink". If you are a regular reader here, you know I love testing new products. So, I ordered two bottles of UV light sensitive fabric ink in yellow and blue. I was waiting to give them a try(Couldn't try as I was on vacation for two months and then we moved, etc etc) and finally got to try them last week. Keep reading to check how you can make one!!

DIY Color changing T-shirt

Wednesday, June 29, 2016

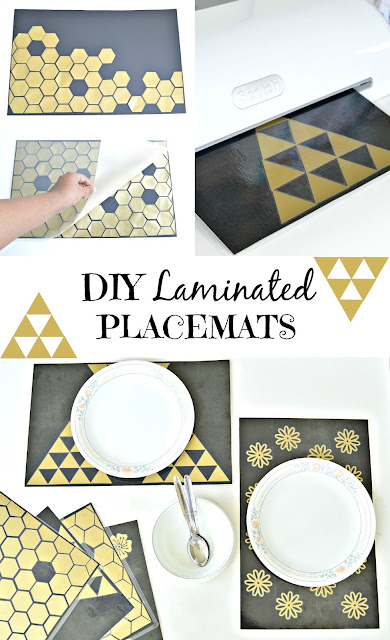
DIY Laminated Placemats

I was looking for placemats wherever I go, I came across a lot of pretty nice ones but they were expensive and at the same time, they were all cloth type placemats which is a lot of maintenance. There were no laminated placemats with pretty patterns or colors, mostly they were with graphics like fruits or some kind of antique pictures.(Atleast in the places where I shopped). I had some large laminate sheets which came with the laminator and I have never used it. They were in the size of placemats.So I thought why not make our own. Here is how I made.

DIY Laminated Placemats

Thursday, March 10, 2016

How to do prints on leather using stencils + DIY Zipper pouch

Well, I am finally back from vacation and trying hard to be back on routine.I feel tired all the time due to jet lag and I think it will take at least few days to get back to the normal routine.I made this zipper pouch before going to vacation and I did not really get time to post this during vacation.So, posting it now.

If you are a regular follower, you might know I got a electronic die cutting machine. I wanted to try cutting designs on leather using the newly released deep cut blade. But I had no luck as the leather was very soft and the blade gets stuck in the leather and started to tear it. I think I have to try ironing the back of the leather with some stabilizer before cutting. For now, I decided to cut a stencil and try to make prints on leather using the stencils. Let's see how.

Wednesday, February 3, 2016

Treats box for valentine's day - Free cut file

Are you looking for a small and cute gift box or a treat box to put your tiny special gift for your loved one? You have come to the right place. Download the free printable template for treats box and make your own. 

Monday, December 21, 2015

How to make personalised candy bars with Almonds & Caramel filling

Last year I tried to make candy bars, just plain melt and pour ones but it did not turn out as expected. I did not want to give up because I have seen many people do it and it looks so simple to make. I was wondering where I went wrong and finally I guessed it may be due to microwaving of chocolate. So, this year, with an additional twist of personalization I am going to show how to make personalised candy bars with almond/caramel filling (Yum! Yum!). Lets get started.  


Wednesday, December 16, 2015

DIY Month/Date Perpetual Calendar

My MoMA inspired cube calendar was a hit last year, so I wanted to share an another DIY calendar idea that can be made with simple supplies. I came up with this idea as I always use to struggle when I want to type/write the present date because I am more use to dd/mm/yyyy growing up in India and I always think twice when I wanted to write the date as mm/dd/yyyy . Let's see how.


Wednesday, October 21, 2015

How to make gift bows using Silhouette


Today is something new and different, I am sharing my first ever tutorial using silhouette (If you are totally new to the word itself,you might want to check about the wonderful craft toy -an electronic cutting machine by clicking the link).Before starting I would like to say, I am not a pro or a experienced silhouette crafter yet so please forgive me if I make any mistakes and tell me in the comments below so that I can learn. (I always appreciate suggestions & comments from fellow crafters :)) 
I also wanted to share a little story about how I got this cutting machine. During April to May, Instructables (You might also want to check that website if you are a DIY addict & Contest lover ,like me) and Silhouette America conducted a Crafting 101 contest in which I submitted my DIY Paper Dahlia  and won second prize in the contest(Yay!!)  for which I received Silhouette Portrait (In last week of August). So lately I have been experimenting and playing a little bit with this crafty tool. 

While I wanted to learn more and get some help from fellow crafters, I joined a Facebook group called Silhouette Design & inspiration and there was a raffle going on when I joined. Like everyone, I entered it just like that and was totally surprised the next day when I got the notification that someone tagged me in a post saying "Congrats" you won a Silhouette Curio(Which is the latest release). I got so surprised and was jumping like anything (Thanks to my hubby for tolerating all the craziness :P).I couldn't believe it happened to me because I have never won anything big like this without putting much effort and time into it. I felt and feel so blessed :) :). So, with two cutting machine in hand , I am telling you before hand that I will sharing some of my experiments with these machines in future posts. 

I think this is the biggest intro ever(Sorry for that!!I had to share it with you) , so without ado  lets move on to the post.