


I love to make braided bracelets , I don't know why ,it feels kind of relaxing and I love to experiment different kinds of braids with different number of strand. I have already made a 4 strand braided bracelet and I wanted to try 8 strand now. Also I have couple of black and white sweaters and shirts and I thought this bracelet will be a perfect accessory to wear with them.


So lets see how to make them.

Materials Required :
Leather or suede leather cord in desired colors
2 ribbon clasps (25mm)
Pliers
2 Jump rings
A lobster clasp
E6000 (optional)
Scotch tape(optional)
Scissors
Rhinestone nail head studs

Step 1: Cut the leather strand in desired colors and required length .I decided to use a one white strand on each side so that I cut 6 10" black strand and 2 10" white strand.My bracelet size is 6" so I measured 10" which is little more than what is needed. Extra is always safe.You can adjust the length of the strand according to your size.

Step 2: Use a piece of tape to line the strands and secure it to easily accommodate the strands into the clasp.Apply some glue(E6000) to the inside of the clasp. Use pliers to close the clasp and secure the strands in place. The clasp itself secures the strands well but I used glue for extra safety. It is completely up to you ,whether to use or not.


Step 3: Secure the clasp with a piece of tape so that it will be easy to braid.Split the strands into four on each side. Now take the first strand from the left and go over the second, under the third and over the fourth strand and join it with the second set of strands so that it has 5 strands of leather on the right and three of the left.

Step 4: Now take the right most strand (no:8) and go under (No:7) ,over (no:6), under (no:5) and over (no:4) and join it with the left set of strands so that it is four again on each side.Repeat step 3 and 4 ,till you reach the desired length. In my case , it is 6" bracelet so I braided 6" and then cut it at 5.5" as the jump rings and clasps adds half an inch extra which adds up to 6".

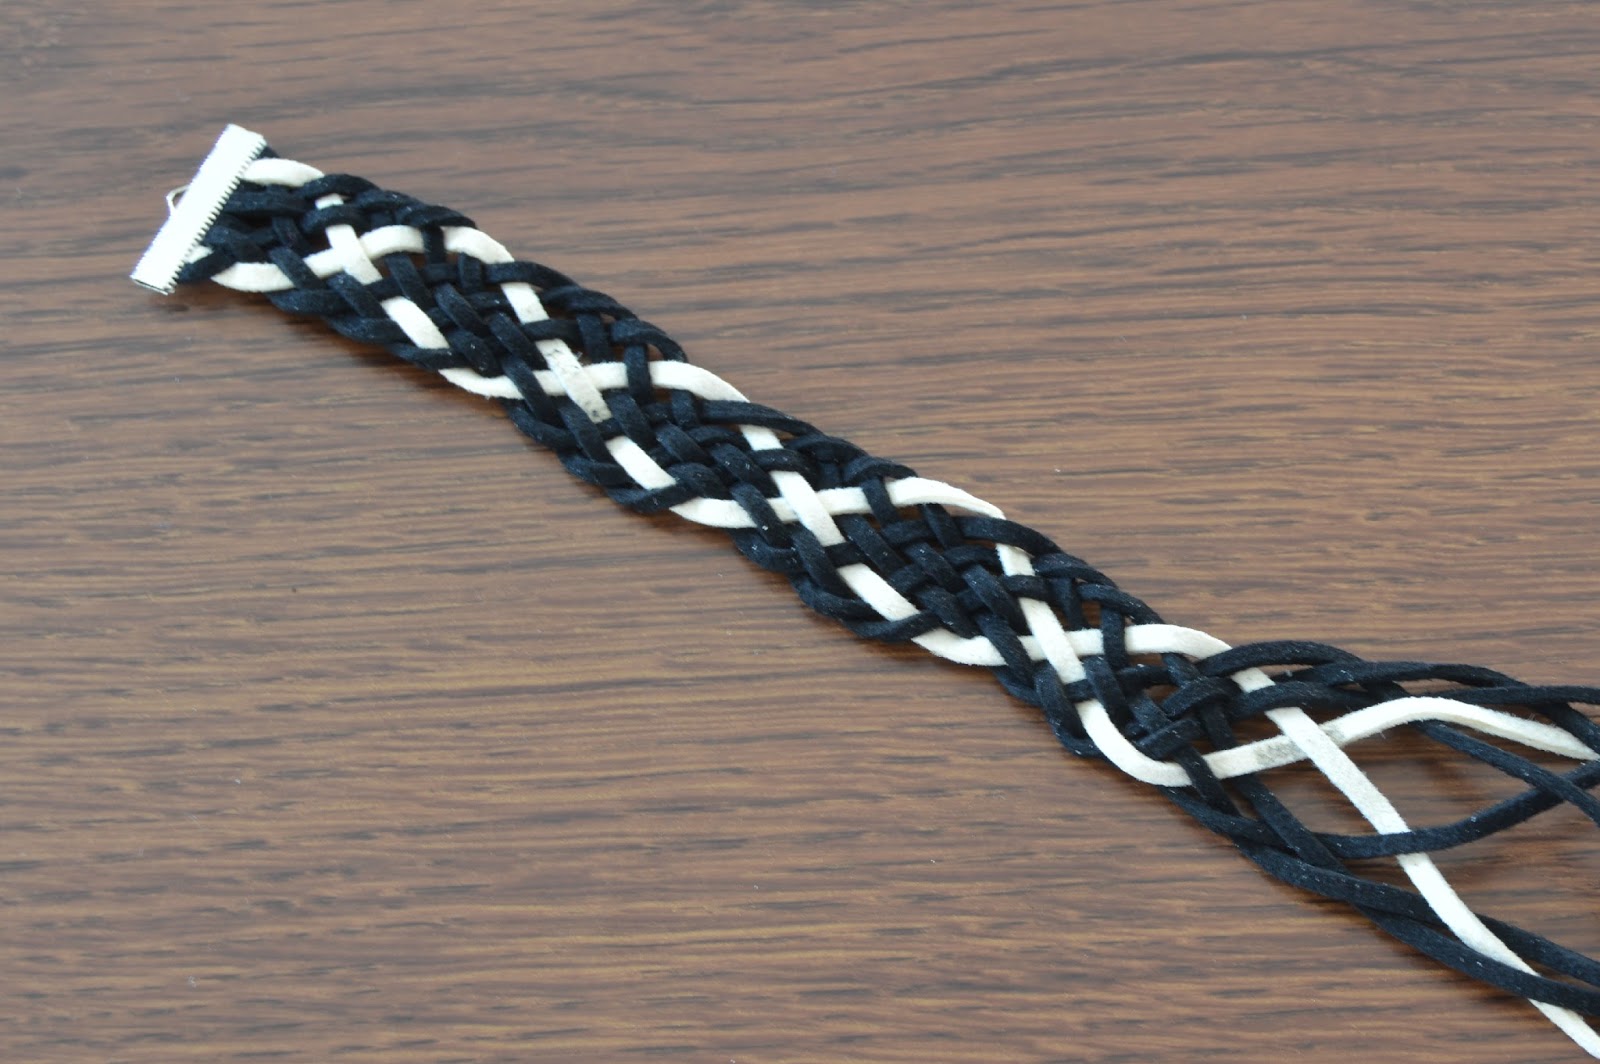
Step 5: Attach the clasp in the same manner as you did in the step 1.Apply some glue ,line the strand and close it with pliers.
Step 6: To add additional glam to the bracelet, I decided to use some rhinestone nail head studs. Just poke them in the desired place and close the studs with help of scissors or pliers at the back to secure.I have shown here in detail on how I used the studs.
Step 7: Attach lobster clasp with jump ring on one side and attach one jump ring on another side to complete the bracelet.Your glamorous 8 strand braided bracelet is now ready to rock the fall season.


Hope you like this tutorial on how to make braided bracelet. You can vary the colors of the strand in different place to get different look for the same bracelet. Give it a try and I am sure you will love them. Share what you think about this bracelet and let us know if you have tried any braided bracelets before.As always I will be happy to hear from you.
SUPER CUTE !!
ReplyDeleteAnd it's not so difficult to make
I really like it :)
Thank you , Winnie :)
DeleteIt's a freindship band which is use for freindship day, I know with these bands there are lots of girl and boys bending each others. I have read the blog and it's colorful band. Although I am working on a freight agency and doing documentation work and it's denoted as ocean freight USA which has amazing workflow.
DeleteI made a necklace not to long ago and your right definitely relaxing I love this so easy and cute ! Need to try asap. Thx so much for sharing @ Welcome Home Wednesdays.
ReplyDeleteThank you, Laci :)
DeleteSuper cute. I might have to try your tutorial. Pinned & shared. Thanks for joining the Inspiration Spotlight party @DearCreatives
ReplyDeleteThank you, Theresa :)
DeleteWow this is so beautiful & you detailed the steps so well. I am a huge fan of chunky bracelets...this would make for an excellent gift!! Thanks for sharing at Welcome Home Wednesday, we'd love to have you back tomorrow :)
ReplyDeleteThank you :)
DeleteLovely post! Thank you for linking up with the OMHG WW & sharing with us! Please come link up again this week at http://www.wrightsimply.com/2015/10/wednesday-linky-come-share.html!! Have a wonderful rest of the week! xx
ReplyDeleteThank you, Ashleigh :)
DeleteYou made it seem so easy! These would make great presents too! It's great co-hosting with you at the #HomeMattersParty
ReplyDeleteIt is so easy , Vickie :)
DeletePretty! I have my 12 year old looking over my should this morning and I can almost guarantee she will be dragging me to the craft store for supplies to try out this bracelet this weekend.
ReplyDeleteHappy to be co-hosting with you again this week #HomeMattersParty
Wow :) It is a fun craft to do with your daughter. Take her to the craft store, I say :)
DeleteCute! Would I be too girly to say I like the bling the best, ha ha. I enjoy hosting the #HomeMattersParty with you.
ReplyDeleteNot at all, Audrey :) Everybody likes the bling :) Thank you :)
DeleteLooks cute! Happy to be co-hosting with you again this week #HomeMattersParty
ReplyDeleteThank you, Enzie:)
DeleteeEally cute, thanks for sharing on the #OMHGFF hope to see you next week!
ReplyDeleteThank you, Karren :)
DeleteSo cute!! That's the craziest braid ever, but you make it look simple! Thanks for sharing! #HomeMattersParty
ReplyDeleteThank you, chelsea :) It seems like crazy but it is so easy :)
DeleteRory is going to love this project! Thanks for sharing and being a wonderful co-host of the #HomeMattersParty - we love having you on the team! :)
ReplyDelete~Lorelai
Life With Lorelai
The bracelet is lovely - Thanks for linking up to Pin Worthy Wednesday, I have pinned your post to the Pin Worthy Wednesday Pinterest Board.
ReplyDeletewhat a fun bracelet! #HomeMattersParty
ReplyDeleteThis is a great DIY jewelry bracelet, it's so cute! #HomeMattersParty
ReplyDeleteVery pretty. #HomeMattersParty
ReplyDeleteYou share an informative post, I'll definitely gonna try those crafting but first I have to find a platform to Write My Dissertation, once I'll find it I'll try all your Jewelery crafting accessories.
ReplyDeleteThis comment has been removed by the author.
ReplyDeleteThis comment has been removed by the author.
ReplyDeleteKeep shining bright! 1v1 lol
ReplyDeleteI find making rope bracelets incredibox game a fun and relaxing activity. Not only does this help me create unique crafts, but it's also a great way to relax and enhance my imagination.
ReplyDeleteMaking an 8-strand kumihimo bracelet requires patience and dexterity as much as tackling difficult economics homework does: If you're struggling with the problems, get help. Economics assignments writing services offer professional advice and assistance, enabling you to handle your academic duties efficiently while still pursuing creative hobbies such as bracelet making sans undue strain.
ReplyDeleteThe 8 Strand Braided Bracelet is the best and beautiful. There are many people searching for the best options available. Also, from the https://pressurecleaningbondi.com.au I saw a lot of great services that provide us the results.
ReplyDeletefinancial analytics software can significantly enhance the management of a small business selling 8 Strand Braided Bracelets by providing detailed insights and streamlined processes. Here's how.
ReplyDeleteYou share an informative post, I'll definitely gonna try those crafting but first I have to find a platform to Mountain cedar
ReplyDeleteI enjoy experimenting with different braid types and strand counts. See: spouting cleaning
ReplyDelete-The "8 Strand Braided Bracelet" is a stylish and durable accessory, perfect for casual or sporty looks. Made from high-quality materials, this bracelet features an intricate 8-strand braid design that offers both strength and flexibility. Whether you're heading to an event or just enjoying a day out, this bracelet adds a touch of class to any outfit. Plus, if you're an active user of Mazaplay, it’s the perfect accessory to complement your gaming lifestyle with a touch of flair.
ReplyDeletethebloxstrap.com has quickly become my favorite tech site. Their articles are always insightful and well-written, providing clear explanations of complex tech topics. The site’s layout is user-friendly, and the content is consistently fresh and relevant. It’s a fantastic resource for anyone passionate about technology.
ReplyDeletesagethumbs.com is simply brilliant. It offers an efficient, user-friendly way to preview images without needing extra software. I’m particularly impressed with how it handles different file formats with ease. It’s lightweight, doesn’t hog system resources, and provides exactly what I need. A fantastic utility overall.
ReplyDeleteThe 8 Strand Braided Bracelet is a unique accessory that showcases craftsmanship and style. Just as this bracelet adds flair to an outfit, Hi viz work trouser enhance safety and functionality in the workplace. Both items reflect a blend of creativity and practicality, whether you’re looking to make a fashion statement or ensure visibility in low-light conditions. Investing in quality accessories and workwear can elevate your personal style while prioritizing safety and effectiveness on the job.
ReplyDeleteThis is such a beautiful and relaxing DIY project — I really enjoyed reading through it! The 8-strand braid looks intricate and stylish, yet your step-by-step explanation makes it feel very achievable, even for someone trying a more complex braid for the first time.
ReplyDeleteI love how you combined black and white strands for a clean, modern look. It’s such a versatile color choice and really does sound like the perfect accessory for fall outfits. The tip about cutting extra length “just to be safe” is also something every crafter can relate to 😊
Adding rhinestone nail head studs for extra glam was a great idea — it takes the bracelet from simple to eye-catching without overdoing it. Your explanation of how to attach the clasps and manage the strands while braiding is especially helpful.
If anyone enjoys discovering creative ideas and useful resources online, you can also take a look at
https://pronosticoshoy.futbol/pronosticos/
Thanks for sharing such a lovely tutorial — it’s definitely inspiring me to try an 8-strand braid myself! ✨
This 8-strand braided bracelet looks so cool, love how intricate and stylish it is! mp3 juice
ReplyDelete