


Paper gift tags are often thrown away once the recipient consumes the gift . How about making gift tags that can be reused as ornaments next year or as fridge magnets, will it not be a cool idea? This gift tag idea is suitable around the year and it is so easy and quick to make. Let's see how.

Materials Required :


Materials Required :
- ACTÍVA Products Plus Air Dry Clay in white
- Rolling pin
- Cookie cutter in desired shapes
- Ribbon
- Ball tool (optional)
- Rhinestones (optional)
- Paint pens


Step 1: Take a piece of clay from the package and roll it flat using a rolling pin.

Step 2: Use cookie cutter to cut a shape for making gift tags. Or you can even use blade and cut any simple geometric shape to make your gift tag.

Step 3: As Christmas is approaching, I made few Christmas themed gift tags.

Step 4: To make it more interesting, add few rhinestones to the gift tags. Just press them wherever you think they are appropriate. Glue is not required. Use a ball tool to engrave your personalized message, add details like eyes and other decorative elements. Use a straw or a small cookie cutter to make a hole on top to string a ribbon. Allow the gift tags to dry. It will take a day to dry completely (depending on the thickness). String a piece of ribbon on top and secure it with a knot.Your gift tag is now ready !!
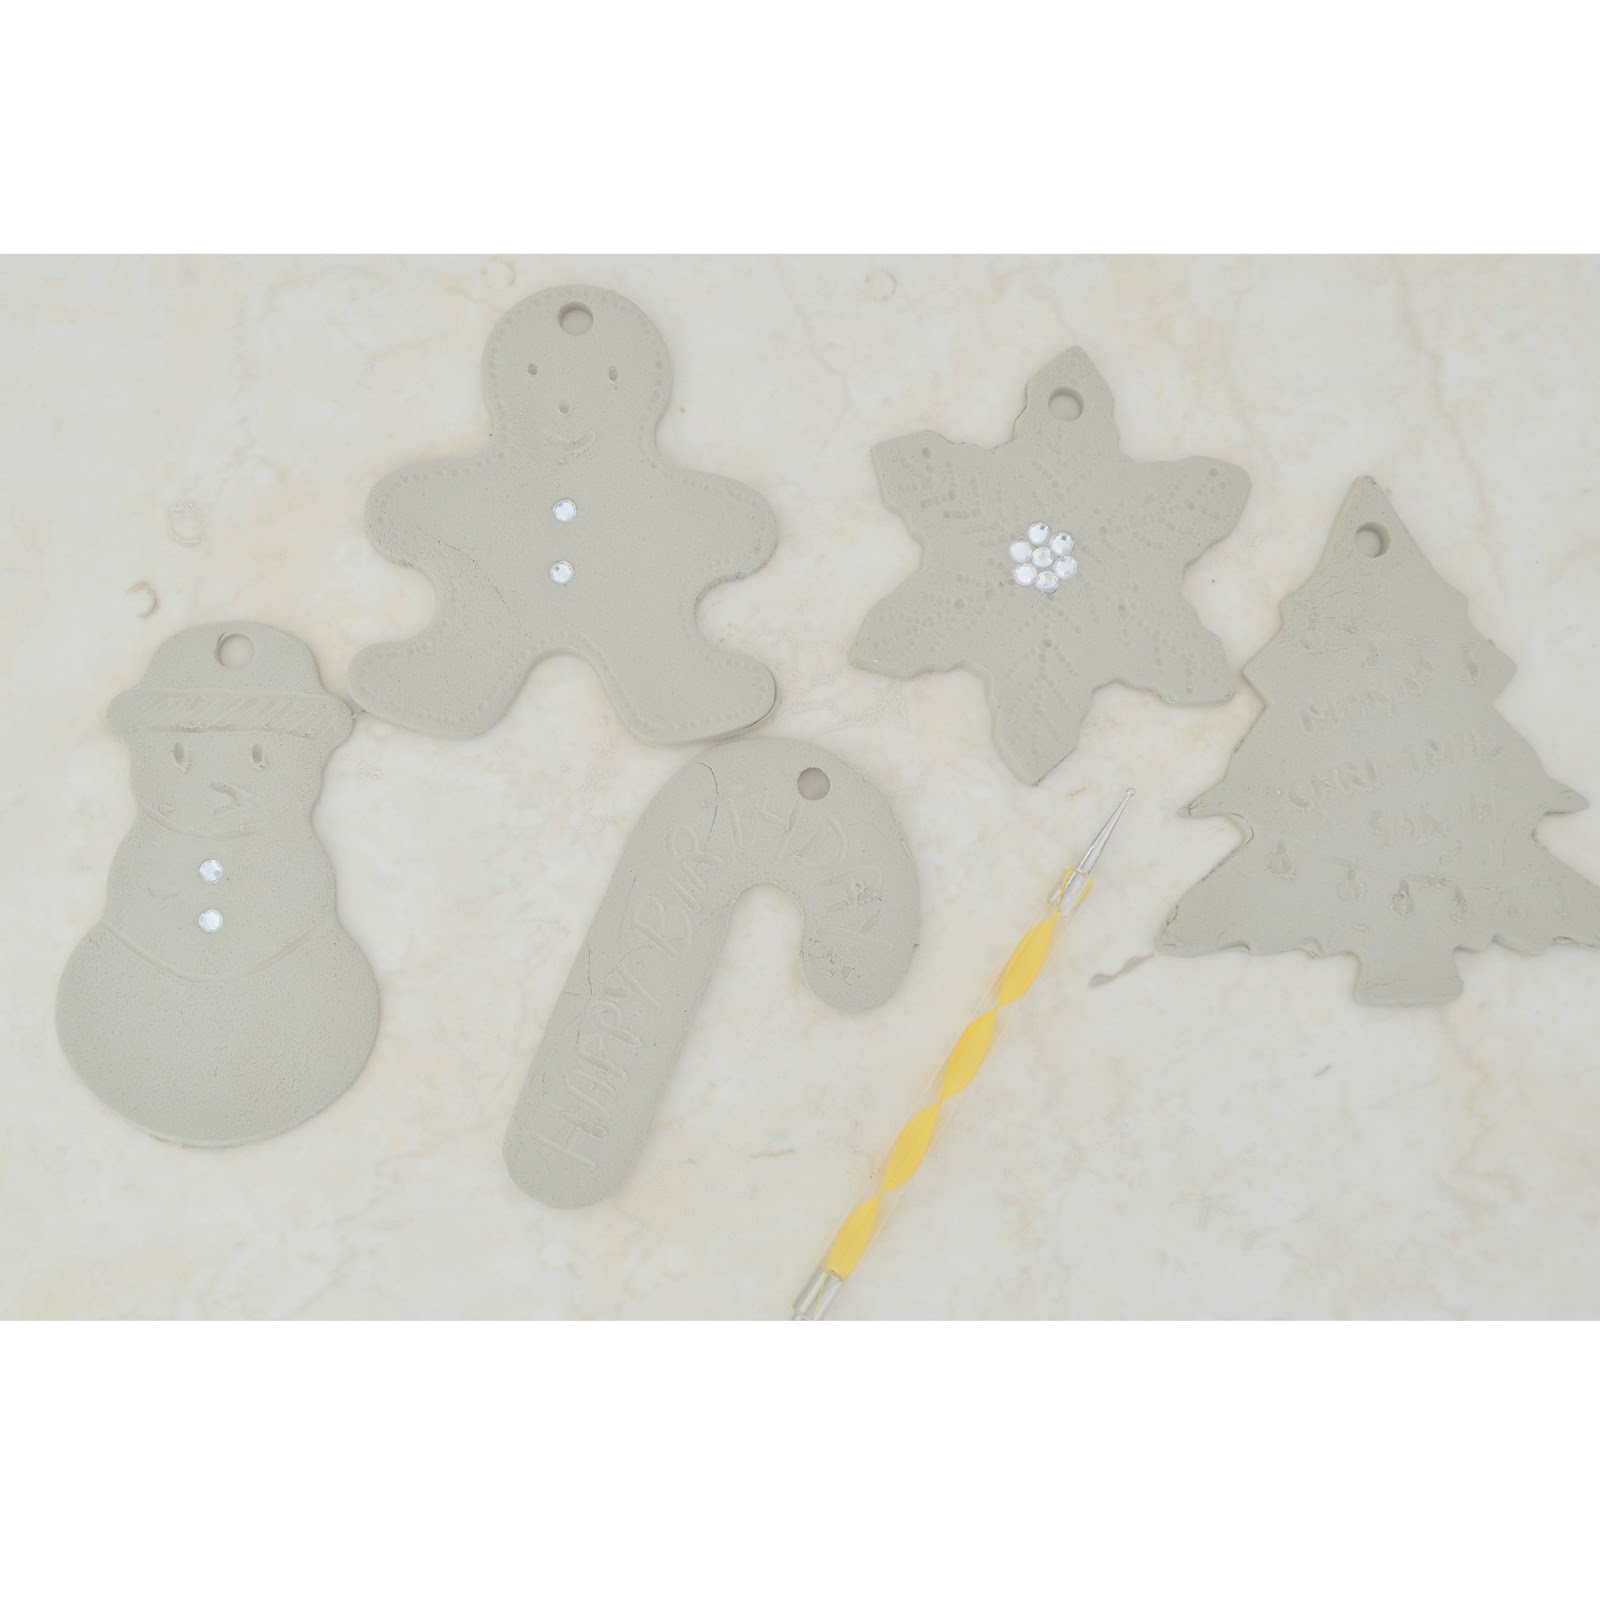
Here is the close up of the snowflake gift tag. If you don't have ball tool, you can even use a toothpick or even a bobby pin to add finer details as shown here.

If you know someone who is celebrating their birthday on Christmas day, you can also use the ball tool and engrave "Happy Birthday".

And use paint pens to decorate the front of the gift tags.

I also tried the image transfer technique to add more personalization to the gift tag. To do this, just print your photo on plain copy paper using an inkjet printer. Just press the photo on the wet clay and leave it for 20- 30 seconds and remove them.You will get a light imprint of the image on the clay. Be sure to flip the image before printing. You can use markers or paint pens to add any message on top once it is dry. Add a ribbon on the back with a piece of tape so that the recipient can use them as fridge magnets if they want to.
Here is another close up shot of how I used the image transfer technique to make a personalized gift tag for an "Anniversary gift".
If you want, you can also highlight the engraved details using marker or paint pens. I hope you enjoyed these easy peasy reusable gift tags using ACTÍVA Products Plus air dry clay.

I made these using air dry clay but you can use the same technique to do gift tags using polymer clay if you want to make colorful and quick gift tags. As air dry clay takes a while to dry , you can use polymer clay and bake to make it hard if you want a quick gift tag using this technique. You can even use thumb prints of yours or even hand prints of babies(May be for grand parents :)) if you want to take the personalization to the next level.
Hope you will give this a try and add more personal touch to your gifts this holiday season. Share what you think about this idea in the comments below. As always I will be happy to hear from you. Be sure to share a picture with me in any of my social media if you happen to make these. I would love to see your creations and share it with other readers.
Disclaimer: This is a sponsored post by Activa products for making a guide in guidecentral.However all the ideas shared are my own.
These are cute little gift tags. Great job! Thanks for sharing this too at Welcome Home Wednesdsays!!!
ReplyDeleteAmazing DIY, thanks! Our esssy writer also offer unlimited free revision on your order within 14 days from the delivery date. We do not charge you if you need some amendments to the essay we deliver.
ReplyDeleteIf you require changes to the essay we rainbow obby deliver, we will not charge you.
ReplyDeleteHandmade, reusable gift tags from air dry clay are an excellent, environmentally responsible way to personalise your gifts. They add a personalised touch to every gift and are simple to alter with various forms and patterns. While you put yourself into brainstorming different ideas, there are some research topics for criminal law that might assist you in coming up with an interesting and pertinent emphasis for your creations.
ReplyDeleteAir-dry clay reusable gift tags are an inventive and environmentally responsible method to customize presents. These long-lasting tags are ideal for eco-friendly giving because they are reusable and provide a considerate touch. For those busy with tasks like crafting or even more complex projects like a business thesis writing service, this DIY is a quick, enjoyable break.
ReplyDeleteWhat a creative idea! DIY reusable gift tags using air-dry clay are such a fun and eco-friendly way to personalize presents. Not only do they add a unique touch, but they can be used again and again, reducing waste. If you're looking for more ways to simplify your holiday preparations, don’t forget that managing your time is key. If you’re juggling coursework and creative projects, a law essay writing service at studyprofy.com can help take the pressure off. They’ll ensure your legal essays are top-notch, so you can focus on your DIY crafts and enjoy the season stress-free!
ReplyDeleteCombining exact timing with rhythmic action, Geometry Dash is an engaging and quick-paced platformer game. Designed by RobTop Games, the game consists of a sequence of more challenging levels in which users control a cube or other item while negotiating complex obstacles in time with an explosive soundtrack.
DeleteThanks for sharing this creative and eco-friendly idea! 🎁✨Roll out the clay, cut into shapes, and imprint designs or names. Let dry, then paint or seal for durability. Punch a hole for ribbon attachment. Perfect for gifts year-round! Lawyers possess in-depth knowledge of the law and legal principles, which allows them to advise clients, represent them in court, and help with legal documents.
ReplyDeletepreliminary protective order hearing virginia
chapter 7 attorney near me
An attorney that focusses on defending those accused of sexual offences in Chesterfield County, Virginia, is known as a Chesterfield County sex crimes lawyer. These lawyers offer knowledgeable legal assistance to clients who are accused of serious offences like sexual assault, abuse, exploitation, or other sex offences that carry harsh penalties like jail time, fines, and permanent registration as a sex offender. chesterfield county sex crimes lawyer
ReplyDeleteThank you for the good blog residential architect services in Virudhunagar Modern residential constructions in Virudhunagar, which is renowned for its serene neighbourhoods and expanding urban setting, are steadily increasing. Today's homeowners are looking for houses that are comfortable, beautiful, and unique, not just buildings. With imagination, accuracy, and a thorough comprehension of your lifestyle requirements, our residential architect services in Virudhunagar are intended to realise your ideal home.
ReplyDeleteThank you for the good blog Residential architecture in Madurai.The top architects in Madurai concentrate on both contemporary building methods and classic architectural concepts.
ReplyDelete