


It's been three years since I had shared my craft space and how I kept my craft supplies organized. We moved twice after that and a lot of things changed - our family grew, our priorities changed and apartment size varied, etc. When we were in North Carolina, I had a small 10 ft X 10 ft space in the living room for my crafts. I did not get time to share that space (I'll share it soon) as we stayed for a very short period of time and also we got pregnant while we were there. Then, we moved to New Jersey when we were 5 months pregnant.
In New Jersey apartment, I do not have any space specifically for my crafts. I have my craft supplies in a shared closet along with our clothes in our master bedroom and have my craft table adjacent to our bed which is used as a multi-purpose table.
Last year, I did not have enough time to organize the craft supplies when we moved into our current apartment as we were expecting a baby and I got busy with getting ready for baby's arrival. Now that he is one year old, I started organizing slowly as I found it difficult to spot things when needed. I worked with what I already had and bought/made a couple of items to complete the organization. Let's see how I did.

Storage cubes:
I was using the dollar store storage cubes to store my craft supplies and also to organized some clothes. First thing I did in this makeover is, I got a new set of storage cubes(Have linked the one I got) in two colors - Teal for my craft supplies and grey for our clothes. It made a huge difference in how the closet looks. You can see it for your self in the before and after pics.


While decluttering the closet I found a hanging jewelry organizer with the tag which I never used. So, I thought I will use that to hold some of my paint bottles and extra tapes and random stuff like nail polishes (I use these as a craft supply 😉- you can find DIYs using nail polish here, here and here ) as these things were taking over my paint bottles shelf.
To make this as a double-sided organizer, I used clear vinyl and cut two pieces(For making two compartments) to match the size of the organizer. I used the stapler to secure it to the organizer. Then, used a washi tape to hide the stapler bin back and also to line the top of the compartments. I stored the bubble mailers and few clear boxes for wrapping gifts in those compartments.


In New Jersey apartment, I do not have any space specifically for my crafts. I have my craft supplies in a shared closet along with our clothes in our master bedroom and have my craft table adjacent to our bed which is used as a multi-purpose table.
Last year, I did not have enough time to organize the craft supplies when we moved into our current apartment as we were expecting a baby and I got busy with getting ready for baby's arrival. Now that he is one year old, I started organizing slowly as I found it difficult to spot things when needed. I worked with what I already had and bought/made a couple of items to complete the organization. Let's see how I did.

I was using the dollar store storage cubes to store my craft supplies and also to organized some clothes. First thing I did in this makeover is, I got a new set of storage cubes(Have linked the one I got) in two colors - Teal for my craft supplies and grey for our clothes. It made a huge difference in how the closet looks. You can see it for your self in the before and after pics.
 |
| Before |
 |
| After |
Look on inside of the storage cubes with craft supplies:
First - All the woodcraft supplies
Second - All paper items like tissue paper, cardstock, photo paper, sticker paper, shrink plastic, etc
Third - Random supplies along with a baking tin for polymer clay, three empty chocolate containers, leather scraps, gemstones, etc.
Fourth - Fake flowers, pinecones, and other seasonal items
Fifth - Perler pegboards, pipe cleaners, glitters, embroidery hoops, etc
Sixth - Spray paints, washable kids paint, cut PVC extra from Curtain rod DIYs, paint palette from Ferrero Rocher container.

Hanging organizers:
As I had pegboard installed in my previous craft space, I found it very useful to brainstorm ideas since it shows most of my supplies in the display. After coming to this apartment, I almost forgot I have particular supplies as they were buried inside somewhere. So, I made myself a DIY hanging pegboard to display the stuff which I have in the original packaging. This saved a lot of space and also gives an idea of rarely used supplies I own.

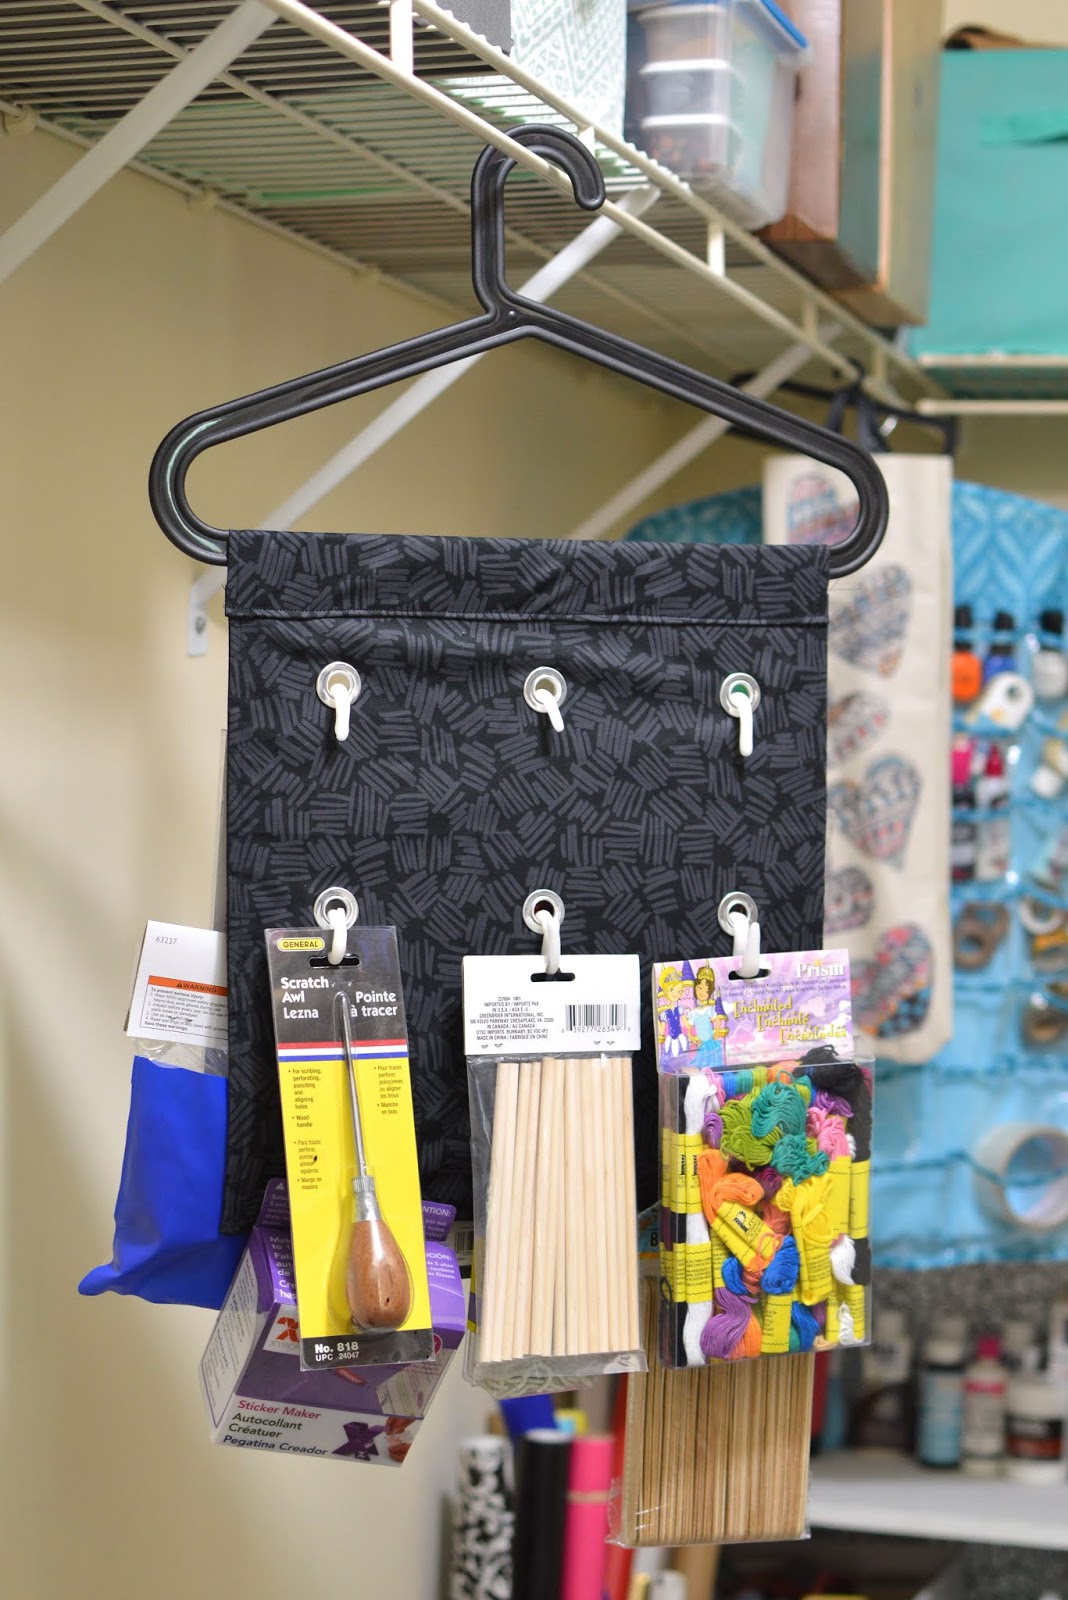
While decluttering the closet I found a hanging jewelry organizer with the tag which I never used. So, I thought I will use that to hold some of my paint bottles and extra tapes and random stuff like nail polishes (I use these as a craft supply 😉- you can find DIYs using nail polish here, here and here ) as these things were taking over my paint bottles shelf.
To make this as a double-sided organizer, I used clear vinyl and cut two pieces(For making two compartments) to match the size of the organizer. I used the stapler to secure it to the organizer. Then, used a washi tape to hide the stapler bin back and also to line the top of the compartments. I stored the bubble mailers and few clear boxes for wrapping gifts in those compartments.


To give you an idea, I also tried storing the acrylic paint bottles while organizing the closet, this organizer holds almost 40 bottles of paint plus some small bottles of paint. I got this hanging jewelry organizer from Five below for $5.

I used one of the small hangers which came with baby items to hang the DIY no-sew ruler cover. It is almost four year since I made this and it is time to make a new one. Can you see that it has got used too much??

In a clear pouch that came with hanger(another baby item), I stored the roses I made for DIY chalkboard canvas with interchangeable roses and chalks. I use these regularly to write "Welcome Note" for our guests and occasional messages so I thought this needed a separate and easily accessible place.
I save these type of pouches whenever I get them as these are really helpful to store small items like this in the closet.

Fabric storage :
I covered a diaper box with contact paper to store all my cotton fabrics. I have all other types of fabric stored in a clear Sterlite box. I have the scraps of fabrics stored in the carton box covered in the contact paper that I used for storage in my NY craft space.


Things I have stored in bins and boxes:
Ribbons:
I used the dowels from my previous DIY ribbon and tape storage under $3 organizer and stacked the ribbons to organize in a dollar store bin. The holes in the bins are perfect for the dowels. I kept the two bigger spools of ribbon and frog tape container on the top to hold pieces of ribbon along with the other ribbon spools in the bin.

Printer paper:
Yes, printer paper also belongs to my craft supplies since I am the one who mostly uses the printer. I used a magazine rack to store printer paper and other paper which I have in bulk.

Stamps, tapes, scissors, Jewelry findings, sewing notions & more:

From the picture:
First - Three small container from dollar store has brushes in one, pens, pencils & paint pens in the second and blade, knife, tweezers- all the sharp objects in the third. I also have foam brushes and other big brushes in a separate candy tin container.
Second - I used the bottom of the cardboard box as a basket to store all the stamps
Third - Jewelry findings and beads are all in the divided container boxes.
Fourth - zippers, hook & loop fasteners are all in the mason jars.
Fifth - scissors & pliers are in the ceramic bowl I used for the DIY flameless fire pit
Some other supplies like pom poms, foam stickers and marbles are in the nuts container. They stayed the same from the last time I organized the craft space.
I have the buttons that I collected from my college days in a separate container:

Wrapping paper, contact paper & wallpaper :
Anything and everything that comes as a roll is put in a medium-sized trash bin and placed in a corner of the shelf.

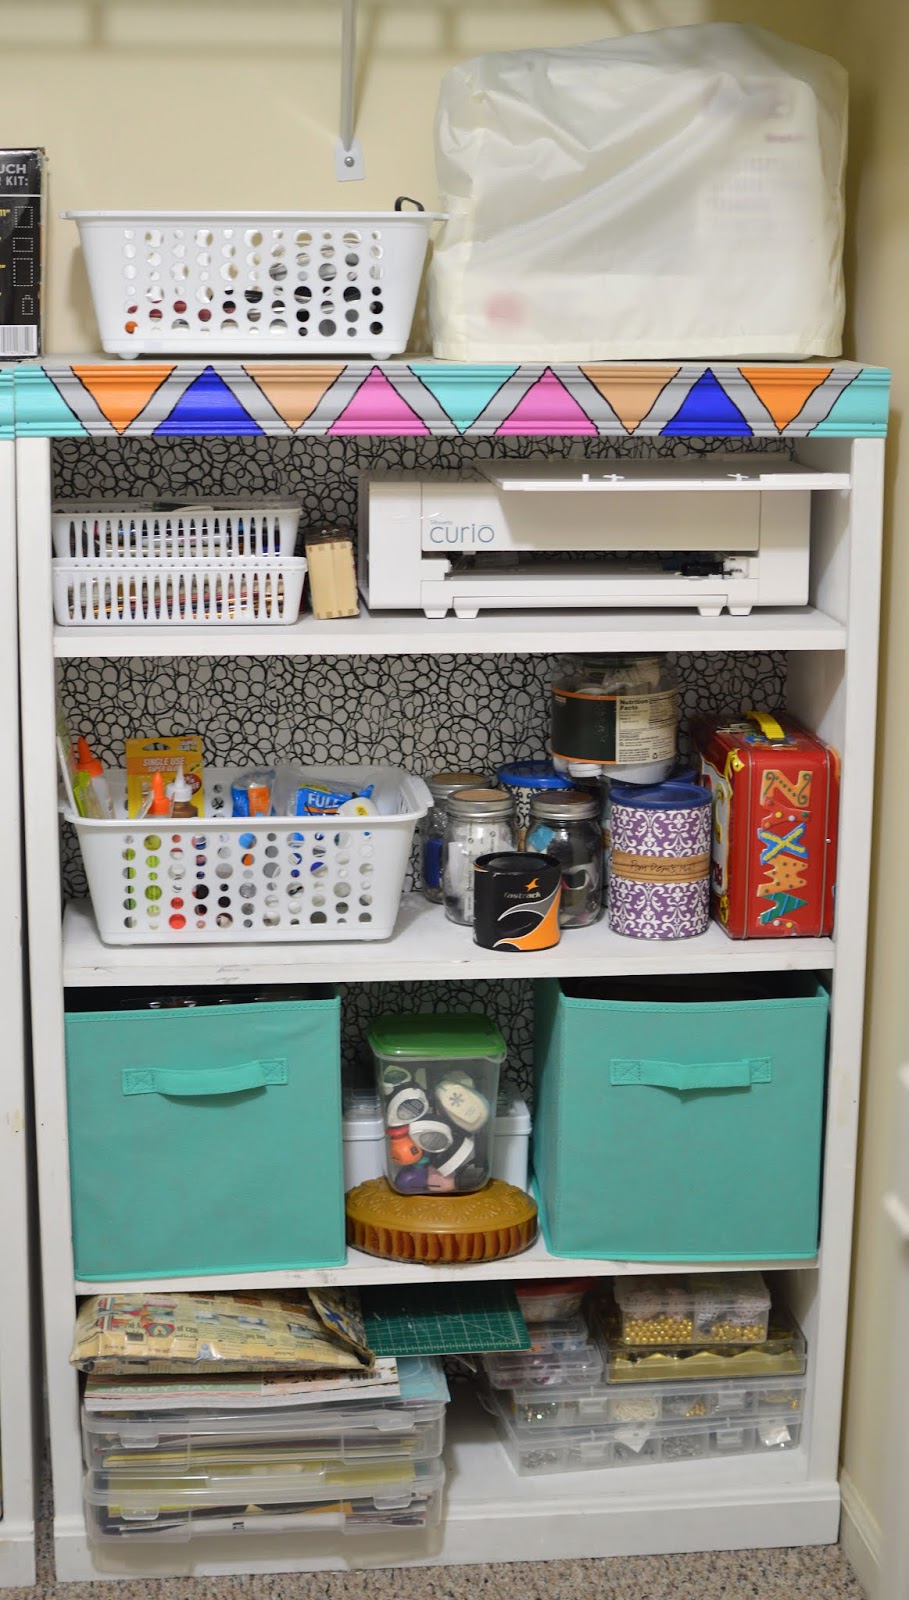
Things on the shelf 1 :

On the top - Vinyl, clay machine, Laminator and ceramic bowl with pliers & scissors
First shelf - Silhouette portrait( electronic cutting machine) and the supplies for the machine in a cardboard box. I have the DIY organizer tray from Ferrero Rocher box which has the sewing kit on the top.
Second shelf- All the paints & dyes
Third shelf - Ribbon, tapes & stamps bins along with DIY organizer from cereal box which has all kind of knickknacks like wire, twine and mostly jewelry stuff. (My Little one tore the ribbon bow which was attached to the box- can you identify it? #reallifeproblems 😝)
Fourth shelf - Polymer clay items, stickers box and perler beads.
Things on shelf 2:
On the top - Sewing supplies basket & sewing machine

First shelf - Three little baskets with supplies(discussed above), xacto knife box & Silhouette Curio
Second shelf - Glue basket, all things in containers, ABCD cookie cutter(Scored in the yard sale)

Third shelf - Storage cubes(supplies shown above), stamp pads and mini die cutters, button box
Fourth shelf - All pattern papers, cardstocks stored in 12 X 12 plastic boxes, Jewelry findings boxes.
Other than the things stored in the shelf, I have the extra stuff stored in the Sterlite storage bin(shown above in the fabric stash picture) and the scraps bin is stored at the top. There is a bag of poly-fil stored in the space on the top left corner. And, The bookshelf on which the items are stored is also a yard sale find which I gave a makeover.
I am not sure whether the final organized picture is Pinterest worthy but I am sure you got some idea/inspiration to organize your supplies. I decided to not spend too much on organizing supplies and worked with what I already have on hand (Because who know when we will move again). The only major spending was the storage cubes and I think it is all worth it. I feel like I did a better job with the limited space and money spend on the organization. According to me, Organizing a space doesn't have to be all fancy and picture perfect. It is something that should make your life easier by spending less amount of time when looking for a particular item in your stash. What say? Share your comments below. As always I will be happy to hear from you.
Disclaimer : I have been compensated by Wikibuy for this post. However all the opinion expressed are my own.
Other posts you might like,


Wow, it looks great! I had so many years of all my craft supplies being in a small space, I'm so glad I have a whole room to devote to them now. You have lots of great tips here. Thanks for sharing at #HomeMattersParty
ReplyDeleteI love how you have used what you had on hand to organize your creative space. I think it looks fabulous. I need to put some of these ideas to use in my own craft closet. #HomeMattersParty
ReplyDeleteGreat stuff! I do have a lot of embroidery stuff waiting to be kept somewhere like this.
ReplyDeleteThis comment has been removed by a blog administrator.
ReplyDeleteTo be honest, I wasn't expecting anything special, but https://www.casino-sistersite.co.uk/memocasino/ was a pleasant surprise. It has a very stylish design, everything works smoothly, and the bonuses from the first deposits are really profitable. Slots are diverse, and there are live games. Withdrawals are fast, which is a big advantage for me.
ReplyDeleteA friend from my Australia-based slots chat recommended RoboCat Casino , knowing I’m always hunting for sites with big jackpot pokies. I joined and quickly got hooked — the game selection is huge, and the potential for big wins is very real. I landed a great payout on a cascading reels pokie last night. The mobile experience is excellent, and depositing AUD was quick and easy. Withdrawals were just as smooth. I’ll be back for sure.
ReplyDeleteI liked the fact that on this site - Slota Casino I was able to play all kinds of quality slot machines in Australia, and therefore I want to recommend this site to you, because in Australia it is the best to play. So if you haven't played on this site yet, then I recommend you to do so! Goodbye and good luck.
ReplyDeleteI liked how clear this was since everything was easy to follow. I will revisit this again. 강서구출장마사지
ReplyDelete