


Got new pants?And the waist is too big for your skinny child or you want to shorten the pants leg or lengthen the pants legs to extend its life. In this post, I am going to discuss about various ways of altering kids pants using both sewing and no-sew method so you can pick up any hack that suits your situation.

Even though you have a lot of adjustable waist pants options nowadays to buy, it is not always possible to buy them. For instance, daily wear or normal cotton pants doesn't come with an adjustable waist and we have to tackle it. I got a set of 3 pack cotton pants from Amazon, after reading the reviews I ordered a size larger and the pants shrunk in length after washed but the waist was up to the size I ordered which is big for my son that I had to try altering all the pants to make it fit and thought it will be easier for parents who are traveling in the same boat.Before, starting a sewing project, do you have a good quality scissors for your sewing project? Here are they,
1) Add a Drawstring to instantly tighten the waist of your pants:
Use a seam ripper to remove the stitches from the front side of the center seam and then insert a drawstring using a plastic yarn needle or a safety pin. You can use fray check to avoid seam raveling. I never used it as the center part was a folded seam and the ripped part was folded back in and the pants seem fine even after many washes. If your kid's pants have a seam that looks raveling use fray check to stop it from fraying.
2)Dapper snapper belts help to hold the pants in place for pants with belt loops :
This is perfect for pants with belt loops. You can easily adjust the waist with the buttons. You can buy a 3-pack on Amazon.
1)Make a DIY adjustable elastic belt using pacifier clips that are perfect for altering any pants:
Use two pacifier clips and connect them using an elastic by folding and stitching the ends. I used fabric to cover the elastic as I had only 1/2" elastic on hand. If you want to cover the elastic in the same way as I did, follow the steps from 1 to 3 to make a basic scrunchy. Instead of connecting the elastic just fold them over and make a stitch on both the ends. I took 5" of 1/2" width elastic and 10" of fabric length & 2" width. You can use this elastic belt on any pants and it is must-have for skinny and tall kids. Don't want to make this belt? Get mitten clips to solve this pants problem.

2) Sew buttons and use buttonhole elastic to tighten the waist:
Stitch buttons on either side and elastic with buttonholes to tighten the pants as peanut mom did. She also shares other ways of altering pants. This can be undone in case you want to use it for another child.

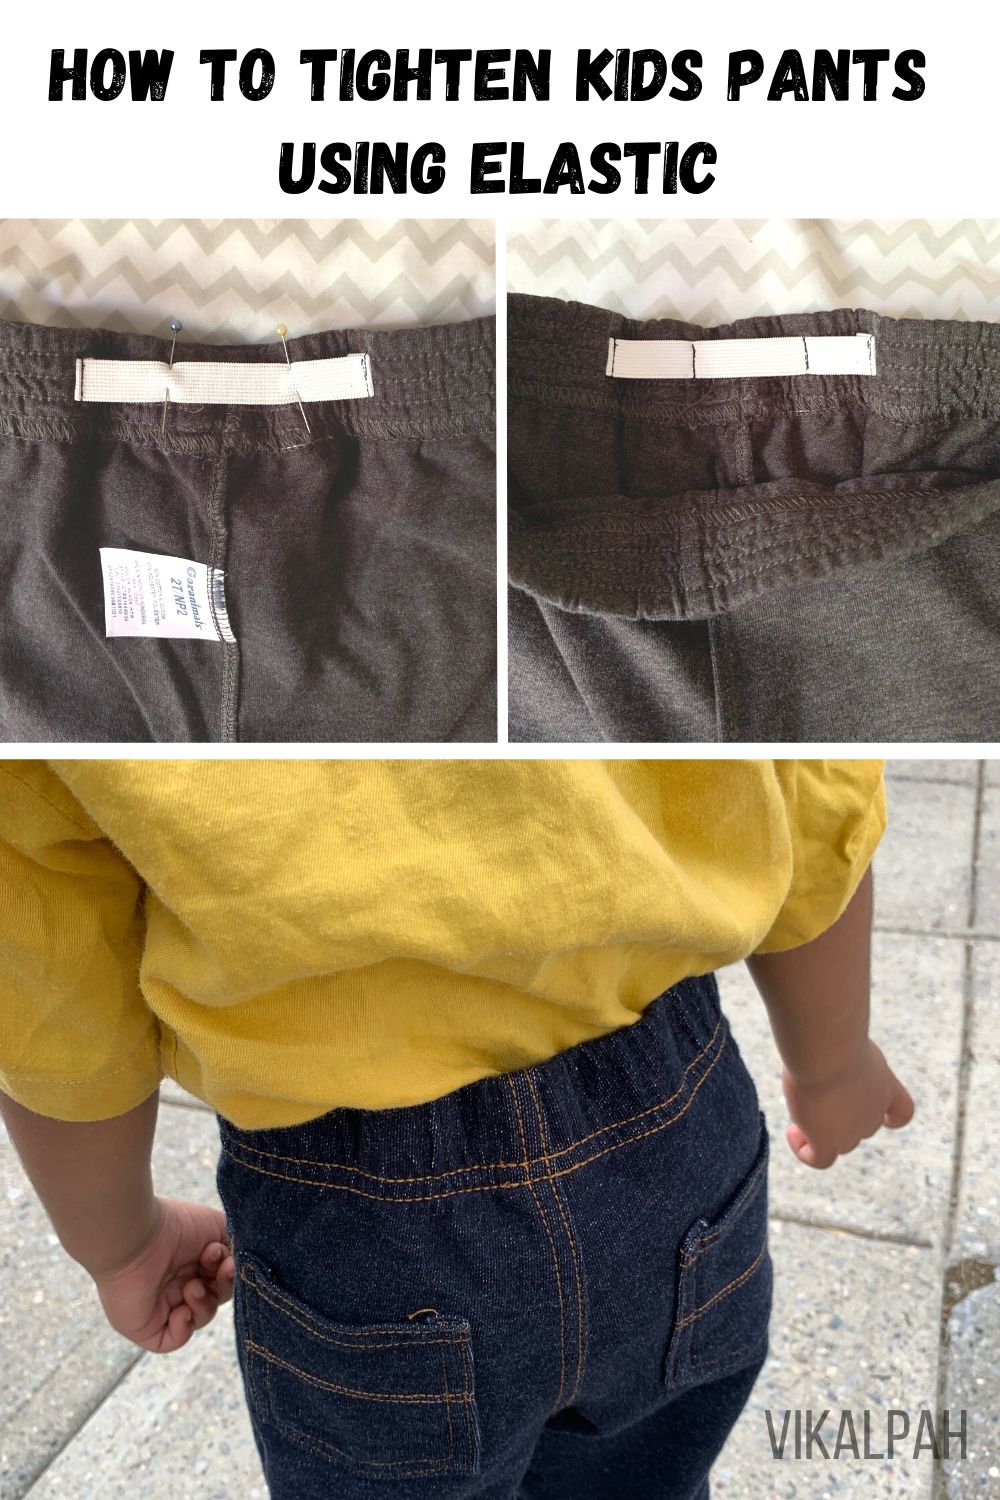
3) Use elastic only to adjust the waist-length in pants:
Use a piece of elastic to tighten the extra length of the waist. Take a piece of elastic .i.e approx 4" in length fold and secure the ends as shown in the picture. Then add a few stitches in between to evenly distribute the extra waist length.

No-sew method to alter kids pants:
1) Add a Drawstring to instantly tighten the waist of your pants:
Use a seam ripper to remove the stitches from the front side of the center seam and then insert a drawstring using a plastic yarn needle or a safety pin. You can use fray check to avoid seam raveling. I never used it as the center part was a folded seam and the ripped part was folded back in and the pants seem fine even after many washes. If your kid's pants have a seam that looks raveling use fray check to stop it from fraying.
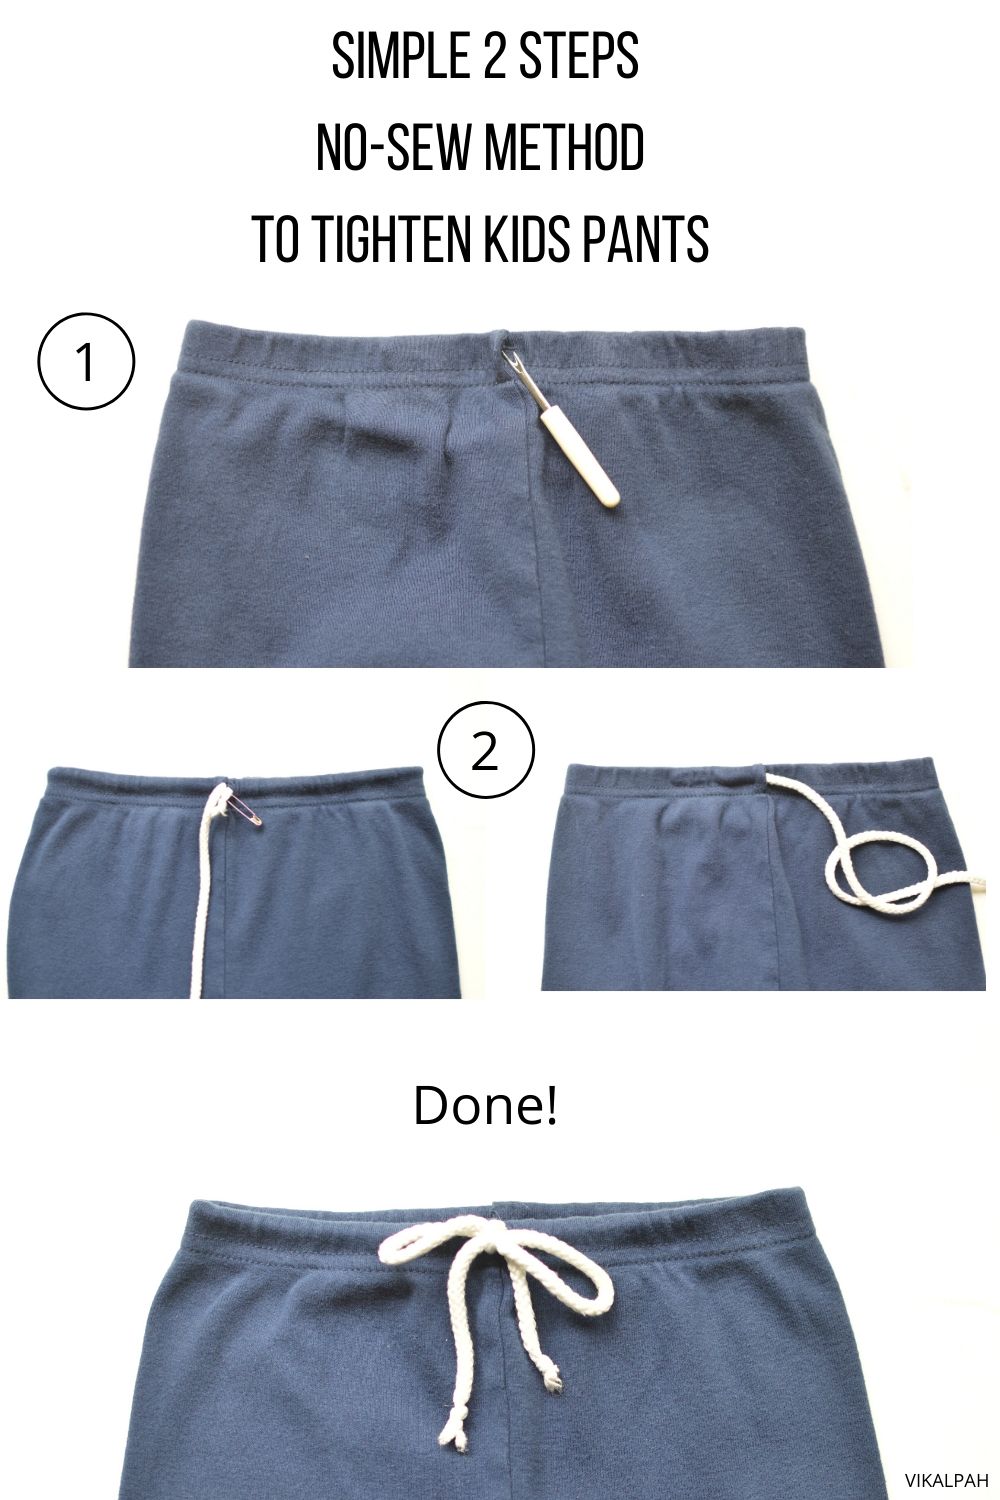 |
| Simple 2 step No-sew method to tighten kids pants |
2)Dapper snapper belts help to hold the pants in place for pants with belt loops :
This is perfect for pants with belt loops. You can easily adjust the waist with the buttons. You can buy a 3-pack on Amazon.
 |
| Source: Amazon |
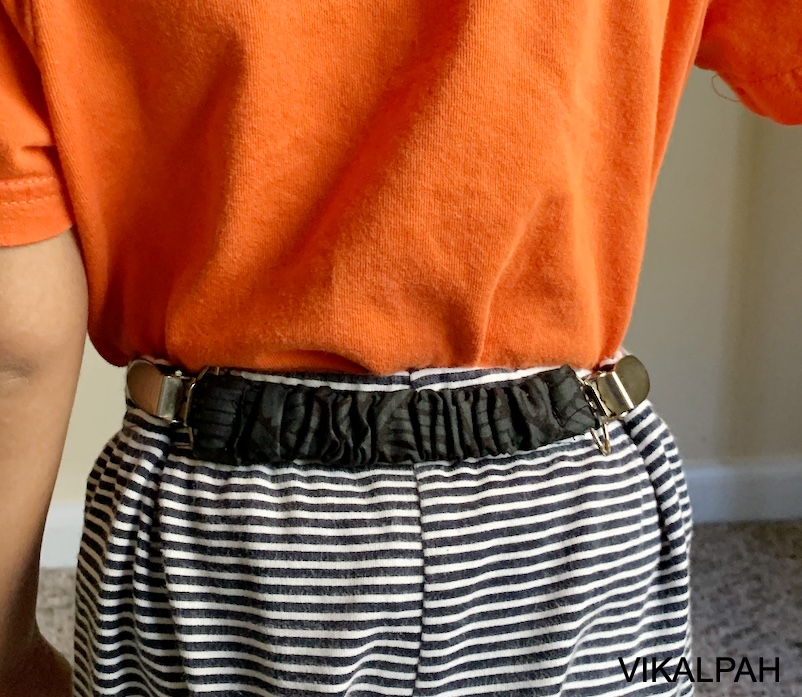
3) Use a suspender belt for holding the pants in place:
Isn't suspenders initially used for the purpose of holding the pants in place? Got one for your kids birthday and never used it again? Use them for the outdoor pants like denim, corduroy pants, etc
Sewing methods to adjust/alter waist in kids pants:
1)Make a DIY adjustable elastic belt using pacifier clips that are perfect for altering any pants:
Use two pacifier clips and connect them using an elastic by folding and stitching the ends. I used fabric to cover the elastic as I had only 1/2" elastic on hand. If you want to cover the elastic in the same way as I did, follow the steps from 1 to 3 to make a basic scrunchy. Instead of connecting the elastic just fold them over and make a stitch on both the ends. I took 5" of 1/2" width elastic and 10" of fabric length & 2" width. You can use this elastic belt on any pants and it is must-have for skinny and tall kids. Don't want to make this belt? Get mitten clips to solve this pants problem.
2) Sew buttons and use buttonhole elastic to tighten the waist:
Stitch buttons on either side and elastic with buttonholes to tighten the pants as peanut mom did. She also shares other ways of altering pants. This can be undone in case you want to use it for another child.

3) Use elastic only to adjust the waist-length in pants:
Use a piece of elastic to tighten the extra length of the waist. Take a piece of elastic .i.e approx 4" in length fold and secure the ends as shown in the picture. Then add a few stitches in between to evenly distribute the extra waist length.
Here is a step by step video of how to alter the waist-length in kids pants: https://www.instagram.com/p/CQH9xl6HGs5/

4)Tuck the extra and sew :
For a quick solution, fold an inch of the waist on the inside(tuck) of the pant and sew along the width of the pants to alter. Make sure to reverse the stitch to avoid raveling. Though not a pretty solution appearance-wise. It does the job. In a pinch, I have also used safety pins to hold the pants in place. The above solution is pretty much the same as using a safety pin but more of a permanent solution.
5)Pull the elastic and stitch to tighten the waist.
Use a seam ripper to make a hole in the waist part of the pant. Make sure you can pull the elastic before you make a hole or rip the seam because in some pants the waist seam is sewn along with the elastic. Pull the elastic through the hole as much as you want to tighten, cut it, overlap one end over the other and make a zigzag stitch to secure it. Put it back in and close the hole using fray check or stitches.You can easily do this even without a sewing machine.
How to shorten pant legs:

How to lengthen pant legs:
You can add a cuff to the hem of the pants to lengthen the pant's legs. Pam shows how she did and also shares how she used ribbons to do her own pants back in 70s.

I hope these hacks were helpful in some way to solve your kid's pants problem. Let me know in the comments if you have any other ways of solving so that the other parents reading this post would be benefitted from it. As always I would love to read the comments from you.
* I did this a year ago and donated the pants so tried it again to show it here. Hence, two different pants in the picture. This is my favorite way of altering the pant as it was quick and stays permanent.
4)Tuck the extra and sew :
For a quick solution, fold an inch of the waist on the inside(tuck) of the pant and sew along the width of the pants to alter. Make sure to reverse the stitch to avoid raveling. Though not a pretty solution appearance-wise. It does the job. In a pinch, I have also used safety pins to hold the pants in place. The above solution is pretty much the same as using a safety pin but more of a permanent solution.
5)Pull the elastic and stitch to tighten the waist.
Use a seam ripper to make a hole in the waist part of the pant. Make sure you can pull the elastic before you make a hole or rip the seam because in some pants the waist seam is sewn along with the elastic. Pull the elastic through the hole as much as you want to tighten, cut it, overlap one end over the other and make a zigzag stitch to secure it. Put it back in and close the hole using fray check or stitches.You can easily do this even without a sewing machine.
How to shorten pant legs:
I got a few pants as a gift from family members when we visited India. The pants fit around the waist was perfect but the length was too long that I had to fold it twice for him to comfortably walk around and it next few minutes it unrolls and makes it uncomfortable. So I decided to fold the legs and used long stitch length to secure the extra. Once he outgrew the length I removed the stitches so he was able to comfortably wear it.
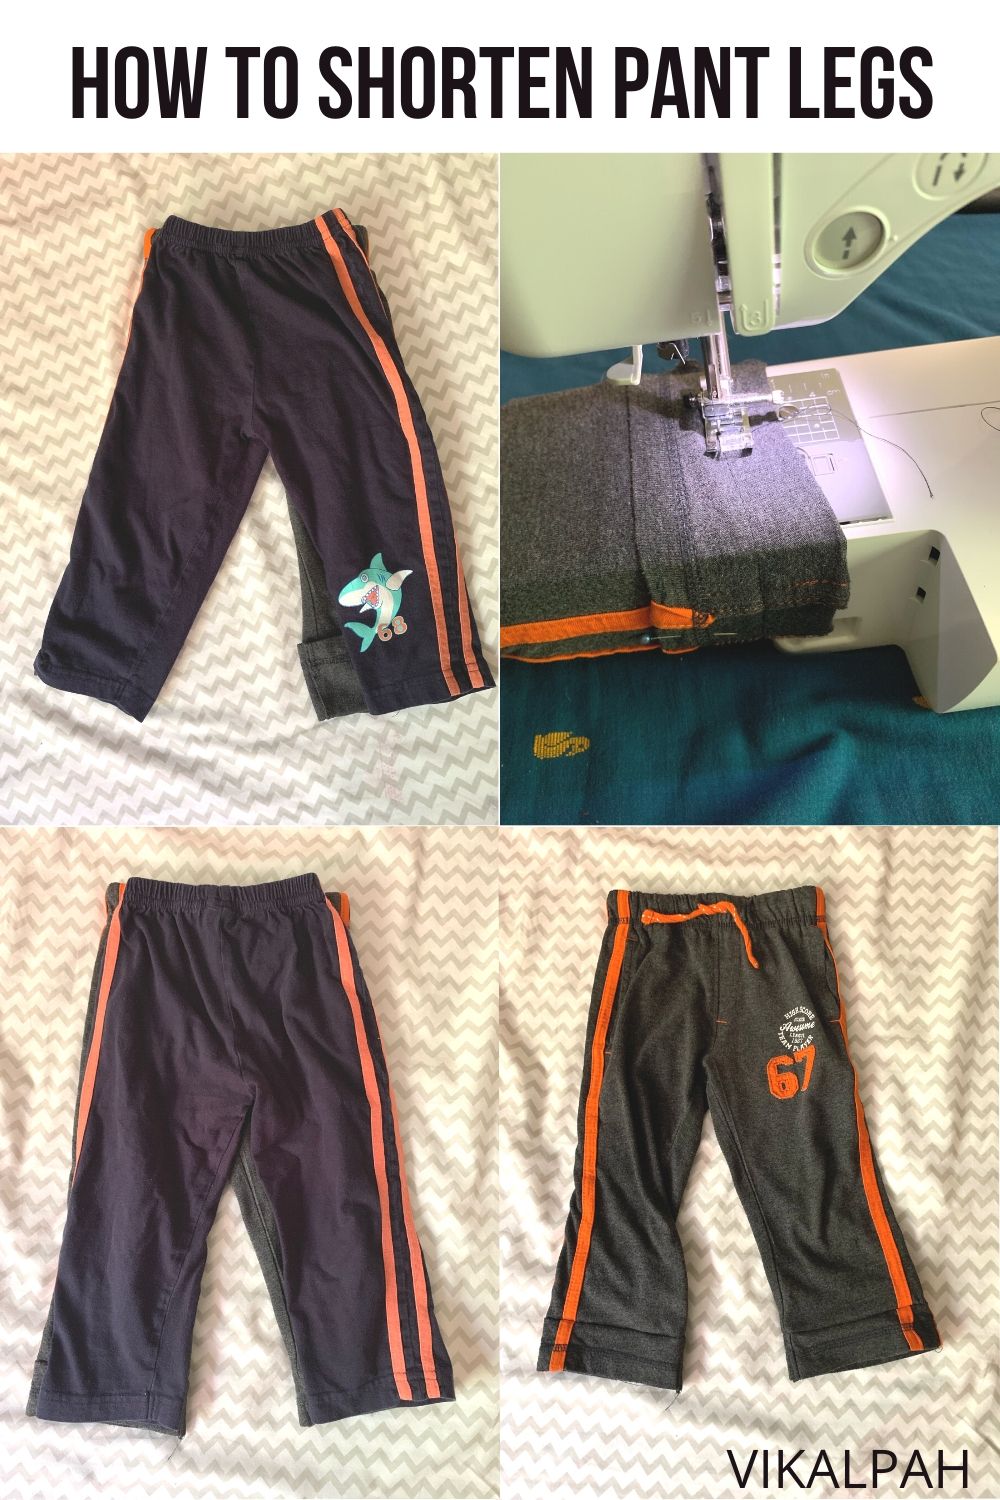
1. Use a pant with perfect height as an example. Fold the pant legs outwards until the length matches your sample pant.
2. Make a stitch with longer length in the middle of the folded part so that extra folds back down to hide the tuck.
You can add a cuff to the hem of the pants to lengthen the pant's legs. Pam shows how she did and also shares how she used ribbons to do her own pants back in 70s.

I hope these hacks were helpful in some way to solve your kid's pants problem. Let me know in the comments if you have any other ways of solving so that the other parents reading this post would be benefitted from it. As always I would love to read the comments from you.
Just starting sewing for the first time? Check these products below - these come handy!

2. Want to mark your measurements on the pants - get this chalk.

3. You need a separate scissors for cutting fabrics, scissors that cut amazon boxes doesn't suit for fabrics.
Other DIYs you might like :


SecurityProUSA is your go-to for private investigation services in Los Angeles. With discreet Delta Executor
ReplyDeleteHello! Wanting to emphasize their curves and have a smoother silhouette, many women use shapewear, as it helps to achieve the desired result! Offering many options for any body type, Shapermint products have become the undisputed leader in the shapewear market. For those who want to learn more about their products, it will be useful to read the information on the website https://shapermint.pissedconsumer.com/customer-service.html and perhaps someone will decide to buy their high-quality products.
ReplyDeleteI have taken notes of a lot of information from this article and applied a lot of it in practice Contexto Unlimited
ReplyDeleteCurious about using Dripify with a standard LinkedIn account, I discovered a game-changer. Do I need a LinkedIn premium account to use Dripify? Check Dripify compatibility https://dripify.com/dripify-compatibility-with-linkedin-accounts/ with LinkedIn accounts. Dripify gives access to more powerful features on LinkedIn. In my experience, its seamless integration, robust safety measures, and insightful analytics made outreach effortless. It saved time, increased productivity, and helped me connect with leads easily. Dripify is perfect for scaling LinkedIn outreach without a premium subscription!
ReplyDeleteHow are you? Due to the fact that it assists in accomplishing the desired look, many women choose to wear shapewear in order to fnaf draw attention to their curves and produce a seamless silhouette.
ReplyDeleteThe game geometry dash meltdown is fast-paced rhythm platformer featuring explosive levels, electronic music, and precise timing challenges.
ReplyDelete